Appearance
Spring Cloud

Author:Eric
Version:9.0.0
待办
- feign 超时时长设定
yml
ribbon:
  ReadTimeout: 10000
ConnectTimeout: 10000- feign 多个同名
yml
spring:
  main:
allow-bean-definition-overriding: true- 【feign】使用 Feign 的方式访问 Zuul 网关 和 gateway 网关 https://blog.csdn.net/s1441101265/article/details/112245582
SpringCloud介绍
微服务架构
微服务架构的提出者:马丁福勒
简而言之,微服务架构样式是一种将单个应用程序开发为一组小服务的方法,每个小服务都在自己的进程中运行并与轻量级机制(通常是HTTP资源API)进行通信。这些服务围绕业务功能构建,并且可以由全自动部署机制独立部署。这些服务的集中管理几乎没有,它可以用不同的编程语言编写并使用不同的数据存储技术。
1、 微服务架构只是一个样式,一个风格。
2、 将一个完成的项目,拆分成多个模块去分别开发。
3、 每一个模块都是单独的运行在自己的容器中。
4、 每一个模块都是需要相互通讯的。 Http,RPC,MQ。
5、 每一个模块之间是没有依赖关系的,单独的部署。
6、 可以使用多种语言去开发不同的模块。
7、 使用MySQL数据库,Redis,ES去存储数据,也可以使用多个MySQL数据库。
总结:将复杂臃肿的单体应用进行细粒度的划分,每个拆分出来的服务各自打包部署。
SpringCloud介绍
SpringCloud是微服务架构落地的一套技术栈。
SpringCloud中的大多数技术都是基于Netflix公司的技术进行二次研发。
SpringCloud的中文社区网站:http://springcloud.cn/
SpringCloud的中文网:http://springcloud.cc/
八个技术点:
- Eureka - 服务的注册与发现
- Ribbon - 服务之间的负载均衡
- Feign - 服务之间的通讯
- Hystrix - 服务的线程隔离以及断路器
- Zuul - 服务网关
- Stream - 实现MQ的使用
- Config - 动态配置
- Sleuth - 服务追踪
服务的注册与发现-Eureka【重点】
引言
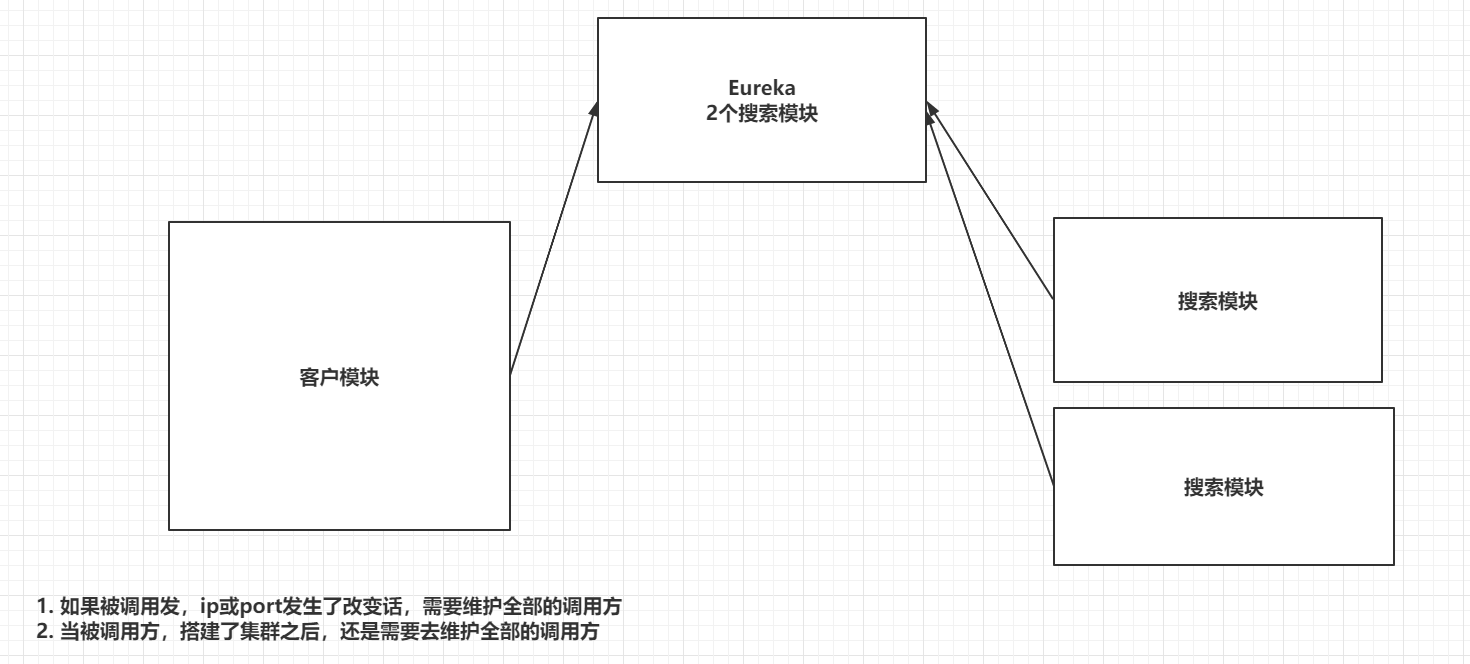
Eureka就是帮助我们维护所有服务的信息,以便服务之间的相互调用
| Eureka |
|---|
 |
Eureka的快速入门
创建EurekaServer
创建一个父工程,并且在父工程中指定SpringCloud的版本,并且将packaing修改为pom
xml
<?xml version="1.0" encoding="UTF-8"?>
<project xmlns="http://maven.apache.org/POM/4.0.0"
         xmlns:xsi="http://www.w3.org/2001/XMLSchema-instance"
         xsi:schemaLocation="http://maven.apache.org/POM/4.0.0 http://maven.apache.org/xsd/maven-4.0.0.xsd">
    <modelVersion>4.0.0</modelVersion>

    <groupId>org.example</groupId>
    <artifactId>J2101-0707-springcloud</artifactId>
    <version>1.0-SNAPSHOT</version>

    <parent>
        <artifactId>spring-boot-starter-parent</artifactId>
        <groupId>org.springframework.boot</groupId>
        <version>3.0.7</version>
    </parent>

    <modules>
        <module>eurekaserver</module>
    </modules>

    <packaging>pom</packaging>

    <dependencyManagement>
        <dependencies>
            <dependency>
                <groupId>org.springframework.cloud</groupId>
                <artifactId>spring-cloud-dependencies</artifactId>
                <version>2022.0.3</version>
                <type>pom</type>
                <scope>import</scope>
            </dependency>
        </dependencies>
    </dependencyManagement>
</project>创建eureka的server,创建SpringBoot工程,并且导入依赖,在启动类中添加注解,编写yml文件
导入依赖
xml
<?xml version="1.0" encoding="UTF-8"?>
<project xmlns="http://maven.apache.org/POM/4.0.0"
         xmlns:xsi="http://www.w3.org/2001/XMLSchema-instance"
         xsi:schemaLocation="http://maven.apache.org/POM/4.0.0 http://maven.apache.org/xsd/maven-4.0.0.xsd">
    <modelVersion>4.0.0</modelVersion>
    <artifactId>eurekaserver</artifactId>

    <parent>
        <artifactId>J2101-0707-springcloud</artifactId>
        <groupId>org.example</groupId>
        <version>1.0-SNAPSHOT</version>
    </parent>

    <dependencies>
        <dependency>
            <groupId>org.springframework.cloud</groupId>
            <artifactId>spring-cloud-starter-netflix-eureka-server</artifactId>
        </dependency>

        <!-- spring-boot-starter -->
        <!-- spring-boot-starter-web -->
        <dependency>
            <groupId>org.springframework.boot</groupId>
            <artifactId>spring-boot-starter-web</artifactId>
        </dependency>

        <!-- spring-boot-devtools -->
        <!-- spring-boot-starter-test -->
        <!-- tomcat-embed-jasper -->
        <!-- mybatis-spring-boot-starter -->
        <!-- druid-spring-boot-starter -->
        <!-- pagehelper-spring-boot-starter -->

        <!-- javax.servlet-api -->
        <!-- spring-context -->
        <!-- spring-aspects -->
        <!-- spring-web -->
        <!-- spring-webmvc -->
        <!-- spring-jdbc -->
        <!-- jackson-databind -->
        <!-- hibernate-validator -->
        <!-- taglibs-standard-impl -->
        <!-- taglibs-standard-spec -->
        <!-- mysql-connector-j -->
        <!-- druid -->
        <!-- mybatis -->
        <!-- mybatis-spring -->
        <!-- pagehelper -->

        <!-- slf4j-api -->
        <!-- slf4j-simple/logback-classic -->
        <!-- log4j -->
    </dependencies>

    <build>
        <plugins>
            <plugin>
                <groupId>org.springframework.boot</groupId>
                <artifactId>spring-boot-maven-plugin</artifactId>
            </plugin>
        </plugins>

        <resources>
            <resource>
                <directory>src/main/java</directory>
                <includes>
                    <include>*.xml</include>
                    <include>**/*.xml</include>
                </includes>
                <filtering>true</filtering>
            </resource>

            <resource>
                <directory>src/main/resources</directory>
                <includes>
                    <include>*</include>
                    <include>**/*</include>
                </includes>
                <filtering>true</filtering>
            </resource>
        </resources>
    </build>

</project>启动类添加注解
java
@SpringBootApplication
@EnableEurekaServer
public class EurekaServerApplication {
    public static void main(String[] args) {
        SpringApplication.run(EurekaServerApplication.class,args);
    }
}编写yml配置文件
yml
server:
  port: 8761      # 端口号

eureka:
  instance:
    hostname: localhost   # localhost
  client:
    registerWithEureka: false
    fetchRegistry: false
    serviceUrl:
defaultZone: http://${eureka.instance.hostname}:${server.port}/eureka/创建EurekaClient
创建Maven工程,修改为SpringBoot
导入依赖
xml
<dependency>
    <groupId>org.springframework.cloud</groupId>
    <artifactId>spring-cloud-starter-netflix-eureka-client</artifactId>
</dependency>

<dependency>
    <groupId>org.springframework.boot</groupId>
    <artifactId>spring-boot-starter-web</artifactId>
</dependency>在启动类上添加注解
java
@SpringBootApplication
@EnableDiscoveryClient
public class CustomerApplication {
    public static void main(String[] args) {
        SpringApplication.run(CustomerApplication.class,args);
    }
}编写配置文件
yml
# 指定Eureka服务地址
eureka:
  client:
    service-url:
      defaultZone: http://localhost:8761/eureka

# 指定服务的名称
spring:
  application:
    name: CUSTOMER
测试Eureka
创建了一个Search搜索模块,并且注册到Eureka
使用到EurekaClient的对象去获取服务信息
java
@Autowired
private EurekaClient eurekaClient;正常RestTemplate调用即可
java
@GetMapping("/customer")
public String customer(){
    //1. 通过eurekaClient获取到SEARCH服务的信息
    InstanceInfo info = eurekaClient.getNextServerFromEureka("SEARCH", false);

    //2. 获取到访问的地址
    String url = info.getHomePageUrl();
    System.out.println(url);

    //3. 通过restTemplate访问
    String result = restTemplate.getForObject(url + "/search", String.class);

    //4. 返回
    return result;
}Eureka的安全性
实现Eureka认证
导入依赖
xml
<dependency>
    <groupId>org.springframework.boot</groupId>
    <artifactId>spring-boot-starter-security</artifactId>
</dependency>编写配置类
java
@EnableWebSecurity
public class WebSecurityConfig extends WebSecurityConfigurerAdapter {

    @Override
    protected void configure(HttpSecurity http) throws Exception {
        // 忽略掉/eureka/**
        http.csrf().ignoringAntMatchers("/eureka/**");
        super.configure(http);
    }
}编写配置文件
yml
 指定用户名和密码
spring:
  security:
    user:
      name: root
password: root其他服务想注册到Eureka上需要添加用户名和密码
eureka:
  client:
    service-url:
defaultZone: http://用户名:密码@localhost:8761/eurekaEureka的高可用
如果程序的正在运行,突然Eureka宕机了。
如果调用方访问过一次被调用方了,Eureka的宕机不会影响到功能。
如果调用方没有访问过被调用方,Eureka的宕机就会造成当前功能不可用。
搭建Eureka高可用
准备多台Eureka
让服务注册到多台Eureka
yml
eureka:
  client:
    service-url:
defaultZone: http://root:root@localhost:8761/eureka,http://root:root@localhost:8762/eureka让多台Eureka之间相互通讯
yml
eureka:
  client:
    registerWithEureka: true      # 注册到Eureka上
    fetchRegistry: true           # 从Eureka拉取信息
    serviceUrl:
defaultZone: http://root:root@localhost:8762/eureka/Eureka的细节
EurekaClient启动是,将自己的信息注册到EurekaServer上,EurekaSever就会存储上EurekaClient的注册信息。
当EurekaClient调用服务时,本地没有注册信息的缓存时,去EurekaServer中去获取注册信息。
EurekaClient会通过心跳的方式去和EurekaServer进行连接。(默认30sEurekaClient会发送一次心跳请求,如果超过了90s还没有发送心跳信息的话,EurekaServer就认为你宕机了,将当前EurekaClient从注册表中移除)
eureka:
  instance:
    lease-renewal-interval-in-seconds: 30      #心跳的间隔
lease-expiration-duration-in-seconds: 90 # 多久没发送,就认为你宕机了EurekaClient会每隔30s去EurekaServer中去更新本地的注册表
eureka:
  client:
registry-fetch-interval-seconds: 30 # 每隔多久去更新一下本地的注册表缓存信息Eureka的自我保护机制,统计15分钟内,如果一个服务的心跳发送比例低于85%,EurekaServer就会开启自我保护机制
- 不会从EurekaServer中去移除长时间没有收到心跳的服务。
- EurekaServer还是可以正常提供服务的。
- 网络比较稳定时,EurekaServer才会开始将自己的信息被其他节点同步过去
yml
eureka:
  server:
enable-self-preservation: true # 开启自我保护机制CAP定理,C - 一致性,A-可用性,P-分区容错性,这三个特性在分布式环境下,只能满足2个,而且分区容错性在分布式环境下,是必须要满足的,只能在AC之间进行权衡。
如果选择CP,保证了一致性,可能会造成你系统在一定时间内是不可用的,如果你同步数据的时间比较长,造成的损失大。
Eureka就是一个AP的效果,高可用的集群,Eureka集群是无中心,Eureka即便宕机几个也不会影响系统的使用,不需要重新的去推举一个master,也会导致一定时间内数据是不一致。
服务间的负载均衡-Ribbon【重点】
引言
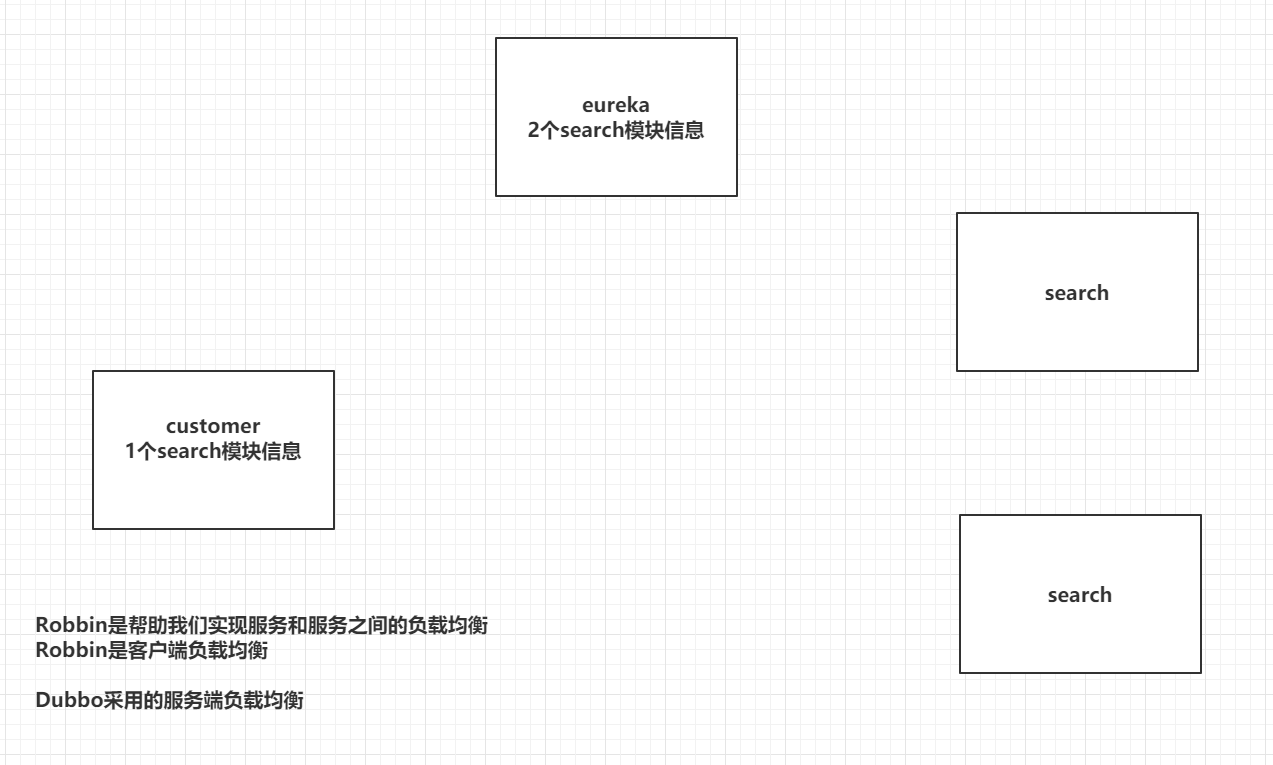
Ribbon是帮助我们实现服务和服务负载均衡,Ribbon属于客户端负载均衡
客户端负载均衡:customer客户模块,将2个Search模块信息全部拉取到本地的缓存,在customer中自己做一个负载均衡的策略,选中某一个服务。
服务端负载均衡:在注册中心中,直接根据你指定的负载均衡策略,帮你选中一个指定的服务信息,并返回。
| Ribbon |
|---|
 |
Ribbon的快速入门
启动两个search模块
在customer导入ribbon依赖
xml
<dependency>
    <groupId>org.springframework.cloud</groupId>
    <artifactId>spring-cloud-starter-netflix-ribbon</artifactId>
</dependency>配置整合RestTemplate和Ribbon
java
@Bean
@LoadBalanced
public RestTemplate restTemplate(){
    return new RestTemplate();
}在customer中去访问search
java
@GetMapping("/customer")
public String customer(){
    String result = restTemplate.getForObject("http://SEARCH/search", String.class);

    //4. 返回
    return result;
}Ribbon配置负载均衡策略
负载均衡策略
- RandomRule:随机策略
- RoundRibbonRule:轮询策略
- WeightedResponseTimeRule:默认会采用轮询的策略,后续会根据服务的响应时间,自动给你分配权重
- BestAvailableRule:根据被调用方并发数最小的去分配
采用注解的形式
java
@Bean
public IRule ribbonRule(){
    return new RandomRule();
}配置文件去指定负载均衡的策略(推荐)
yml
 指定具体服务的负载均衡策略
SEARCH:      # 编写服务名称
  ribbon:
NFLoadBalancerRuleClassName: com.netflix.loadbalancer.WeightedResponseTimeRule # 具体负载均衡使用的类服务间的调用-Feign【重点】
引言
Feign可以帮助我们实现面向接口编程,就直接调用其他的服务,简化开发。
Feign的快速入门
导入依赖
xml
<dependency>
    <groupId>org.springframework.cloud</groupId>
    <artifactId>spring-cloud-starter-openfeign</artifactId>
</dependency>添加一个注解
@EnableFeignClients("com.futureweaver.client")创建一个接口,并且和Search模块做映射
java
@FeignClient("SEARCH")   // 指定服务名称
public interface SearchClient {

    // value -> 目标服务的请求路径,method -> 映射请求方式
    @RequestMapping(value = "/search",method = RequestMethod.GET)
    String search();

}测试使用
java
@Autowired
private SearchClient searchClient;

@GetMapping("/customer")
public String customer(){
    String result = searchClient.search();
    return result;
}Feign的传递参数方式
注意事项
- 如果你传递的参数,比较复杂时,默认会采用POST的请求方式。
- 传递单个参数时,推荐使用
@PathVariable,如果传递的单个参数比较多,这里也可以采用@RequestParam,不要省略value属性- 传递对象信息时,统一采用json的方式,添加
@RequestBody- Client接口必须采用
@RequestMapping
在Search模块下准备三个接口
java
@GetMapping("/search/{id}")
public Customer findById(@PathVariable Integer id){
    return new Customer(1,"张三",23);
}

@GetMapping("/getCustomer")
public Customer getCustomer(@RequestParam Integer id,@RequestParam String name){
    return new Customer(id,name,23);
}

@PostMapping("/save")
public Customer save(@RequestBody Customer customer){
    return customer;
}封装Customer模块下的Controller
java
@GetMapping("/customer/{id}")
public Customer findById(@PathVariable Integer id){
    return searchClient.findById(id);
}

@GetMapping("/getCustomer")
public Customer getCustomer(@RequestParam Integer id, @RequestParam String name){
    return searchClient.getCustomer(id,name);
}

@GetMapping("/save")            // 会自动转换为POST请求  405
public Customer save(Customer customer){
    return searchClient.save(customer);
}再封装Client接口
java
@RequestMapping(value = "/search/{id}",method = RequestMethod.GET)
Customer findById(@PathVariable(value = "id") Integer id);

@RequestMapping(value = "/getCustomer",method = RequestMethod.GET)
Customer getCustomer(@RequestParam(value = "id") Integer id, @RequestParam(value = "name") String name);

@RequestMapping(value = "/save",method = RequestMethod.POST)
Customer save(@RequestBody Customer customer);测试
Feign的Fallback
Fallback可以帮助我们在使用Feign去调用另外一个服务时,如果出现了问题,走服务降级,返回一个错误数据,避免功能因为一个服务出现问题,全部失效。
FallBack方式
创建一个POJO类,实现Client接口。
java
@Component
public class SearchClientFallBack implements SearchClient {
    @Override
    public String search() {
        return "出现问题啦!!!";
    }

    @Override
    public Customer findById(Integer id) {
        return null;
    }

    @Override
    public Customer getCustomer(Integer id, String name) {
        return null;
    }

    @Override
    public Customer save(Customer customer) {
        return null;
    }
}修改CLient接口中的注解,添加一个属性。
@FeignClient(value = "SEARCH",fallback = SearchClientFallBack.class)添加一个配置文件。
yml
 feign和hystrix组件整合
feign:
  hystrix:
enabled: trueFallBackFactory方式
调用方无法知道具体的错误信息是什么,通过FallBackFactory的方式去实现这个功能
FallBackFactory基于Fallback
创建一个POJO类,实现
FallBackFactory<Client>
java
@Component
public class SearchClientFallBackFactory implements FallbackFactory<SearchClient> {

    @Autowired
    private SearchClientFallBack searchClientFallBack;

    @Override
    public SearchClient create(Throwable throwable) {
        throwable.printStackTrace();
        return searchClientFallBack;
    }
}修改Client接口中的属性
java
@FeignClient(value = "SEARCH",fallbackFactory = SearchClientFallBackFactory.class)服务的隔离及断路器-Hystrix【重点】
简介
雪崩问题
解决雪崩问题的主要手段: 降级
- 线程隔离
- 服务熔断
线程隔离
导入依赖
xml
<dependency>
    <groupId>org.springframework.cloud</groupId>
    <artifactId>spring-cloud-starter-netflix-hystrix</artifactId>
</dependency>SpringBootApplication添加注解
@EnableCircuitBreaker
不推荐
@SpringCloudApplication
推荐
在调用其他服务的方法头部添加注解
@HystrixCommand(fallbackMethod = "queryByIdFallback")
添加熔断器的回调函数
- 方法参数(个数/参数类型)要一致
- 方法返回值类型要一致
- 方法名要和注解中的客串一致
java
    public String queryByIdFallback(Long id) {
        return "网络出错了";
}ConsumerController.java完整代码
java
package com.futureweaver.consumer.controller;

import com.futureweaver.consumer.pojo.User;
import com.netflix.hystrix.contrib.javanica.annotation.DefaultProperties;
import com.netflix.hystrix.contrib.javanica.annotation.HystrixCommand;
import javafx.beans.DefaultProperty;
import org.springframework.beans.factory.annotation.Autowired;
import org.springframework.cloud.client.ServiceInstance;
import org.springframework.cloud.client.discovery.DiscoveryClient;
import org.springframework.web.bind.annotation.GetMapping;
import org.springframework.web.bind.annotation.PathVariable;
import org.springframework.web.bind.annotation.RequestMapping;
import org.springframework.web.bind.annotation.RestController;
import org.springframework.web.client.RestTemplate;

import java.util.List;

@RestController
@RequestMapping("consumer")
public class ConsumerController {

    @Autowired
    private RestTemplate restTemplate;

    @Autowired
    private DiscoveryClient discoveryClient;

    @GetMapping("{id}")
    @HystrixCommand(fallbackMethod = "queryByIdFallback")
    public String queryById(@PathVariable("id") Long id){
        // 1
//        String url = "http://localhost:8081/user/" + id;

        // 2
//        List<ServiceInstance> instances = discoveryClient.getInstances("user-service");
//        ServiceInstance instance = instances.get(0);
//        String url = String.format("http://%s:%s/user/%s", instance.getHost(), instance.getPort(), id);

        // 3
        String url = "http://user-service/user/" + id;

        String user = restTemplate.getForObject(url, String.class);
        return user;
    }

    // 1. 方法参数(个数/参数类型)要一致
    // 2. 方法返回值类型要一致
    public String queryByIdFallback(Long id) {
        return "网络出错了";
    }
}进行统一设置
tex
hystrix:
  command:
    default:
      execution:
        isolation:
          thread:
timeoutInMilliseconds: 3000服务熔断
设置默认参数
tex
hystrix:
  command:
    default:
      circuitBreaker:
        requestVolumeThreshold: 10
        errorThresholdPercentage: 50
sleepWindowInMilliseconds: 10000修改代码
使一些情况会失败,一些情况会成功 失败达到阀值之后,再测试成功,熔断器的状态依然是打开状态,返回错误信息
java
package com.futureweaver.consumer.controller;

import com.futureweaver.consumer.pojo.User;
import com.netflix.hystrix.contrib.javanica.annotation.DefaultProperties;
import com.netflix.hystrix.contrib.javanica.annotation.HystrixCommand;
import javafx.beans.DefaultProperty;
import org.springframework.beans.factory.annotation.Autowired;
import org.springframework.cloud.client.ServiceInstance;
import org.springframework.cloud.client.discovery.DiscoveryClient;
import org.springframework.web.bind.annotation.GetMapping;
import org.springframework.web.bind.annotation.PathVariable;
import org.springframework.web.bind.annotation.RequestMapping;
import org.springframework.web.bind.annotation.RestController;
import org.springframework.web.client.RestTemplate;

import java.util.List;

@RestController
@RequestMapping("consumer")
@DefaultProperties(defaultFallback = "defaultFallback")
public class ConsumerController {

    @Autowired
    private RestTemplate restTemplate;

    @Autowired
    private DiscoveryClient discoveryClient;

    @GetMapping("{id}")
    @HystrixCommand
    public String queryById(@PathVariable("id") Long id){
        // 1
//        String url = "http://localhost:8081/user/" + id;

        // 2
//        List<ServiceInstance> instances = discoveryClient.getInstances("user-service");
//        ServiceInstance instance = instances.get(0);
//        String url = String.format("http://%s:%s/user/%s", instance.getHost(), instance.getPort(), id);

        if (id == 1) {
            throw new RuntimeException("出错了");
        }

        // 3
        String url = "http://user-service/user/" + id;

        String user = restTemplate.getForObject(url, String.class);
        return user;
    }

    // 1. 方法参数(个数/参数类型)要一致
    // 2. 方法返回值类型要一致
    public String queryByIdFallback(Long id) {
        return "网络出错了";
    }

    // 1. 方法参数为空
    public String defaultFallback() {
        return "网络出错了!defaultFallback";
    }
}引言
| Hystrix |
|---|
 |
降级机制实现
导入依赖
xml
<dependency>
    <groupId>org.springframework.cloud</groupId>
    <artifactId>spring-cloud-starter-netflix-hystrix</artifactId>
</dependency>添加一个注解
@EnableCircuitBreaker针对某一个接口去编写他的降级方法
java
@GetMapping("/customer/{id}")
@HystrixCommand(fallbackMethod = "findByIdFallBack")
public Customer findById(@PathVariable Integer id){
    int i = 1/0;
    return searchClient.findById(id);
}

// findById的降级方法  方法的描述要和接口一致
public Customer findByIdFallBack(Integer id){
    return new Customer(-1,"",0);
}在接口上添加注解
@HystrixCommand(fallbackMethod = "findByIdFallBack")5、 测试一下
| 效果 |
|---|
 |
线程隔离
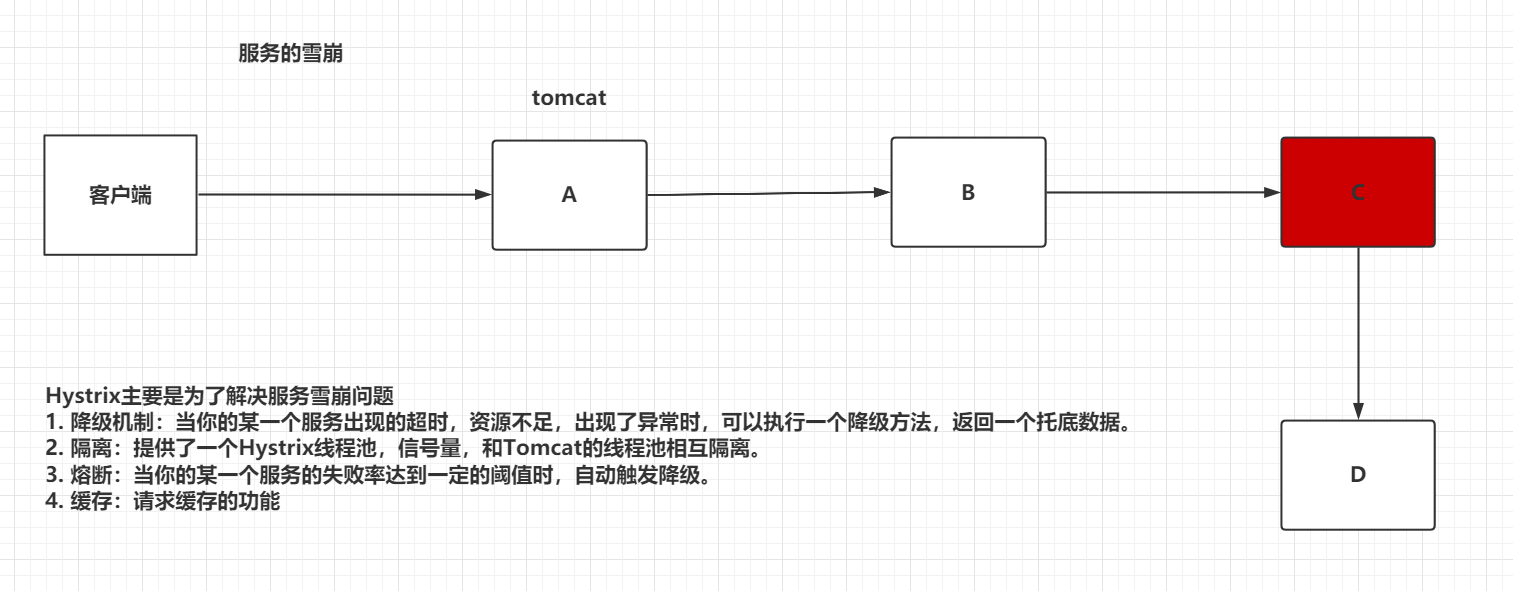
如果使用Tomcat的线程池去接收用户的请求,使用当前线程去执行其他服务的功能,如果某一个服务出现了故障,导致tomcat的线程大量的堆积,导致Tomcat无法处理其他业务功能。
- Hystrix的线程池(默认),接收用户请求采用tomcat的线程池,执行业务代码,调用其他服务时,采用Hystrix的线程池。
- 信号量,使用的还是Tomcat的线程池,帮助我们去管理Tomcat的线程池。
Hystrix的线程池的配置
| 配置信息 | name | value |
|---|---|---|
| 线程隔离策略 | execution.isolation.strateg | THREAD |
| 指定超时时间 | execution.isolation.thread.timeoutInMilliseconds | 1000 |
| 是否开启超时时间配置 | execution.timeout.enabled | true |
| 超时之后是否中断线程 | execution.isolation.thread.interruptOnTimeout | true |
| 取消任务后知否 | execution.isolation.thread.interruptOnCancel | false |
代码实现
java
@GetMapping("/customer/{id}")
@HystrixCommand(fallbackMethod = "findByIdFallBack",commandProperties = {
        @HystrixProperty(name = "execution.isolation.strategy",value = "THREAD"),
        @HystrixProperty(name = "execution.isolation.thread.timeoutInMilliseconds",value = "3000")
})
public Customer findById(@PathVariable Integer id) throws InterruptedException {
    System.out.println(Thread.currentThread().getName());
    Thread.sleep(300);
    return searchClient.findById(id);
}信号量的配置信息
| 配置信息 | name | value |
|---|---|---|
| 线程隔离策略 | execution.isolation.strateg | SEMAPHORE |
| 指定信号量的最大并发请求数 | execution.isolation.semaphore.maxConcurrentRequests | 10 |
代码实现
java
@GetMapping("/customer/{id}")
@HystrixCommand(fallbackMethod = "findByIdFallBack",commandProperties = {
        @HystrixProperty(name = "execution.isolation.strategy",value = "SEMAPHORE")
})
public Customer findById(@PathVariable Integer id) throws InterruptedException {
    System.out.println(Thread.currentThread().getName());
    return searchClient.findById(id);
}断路器
断路器介绍
马丁福勒断路器论文:https://martinfowler.com/bliki/CircuitBreaker.html
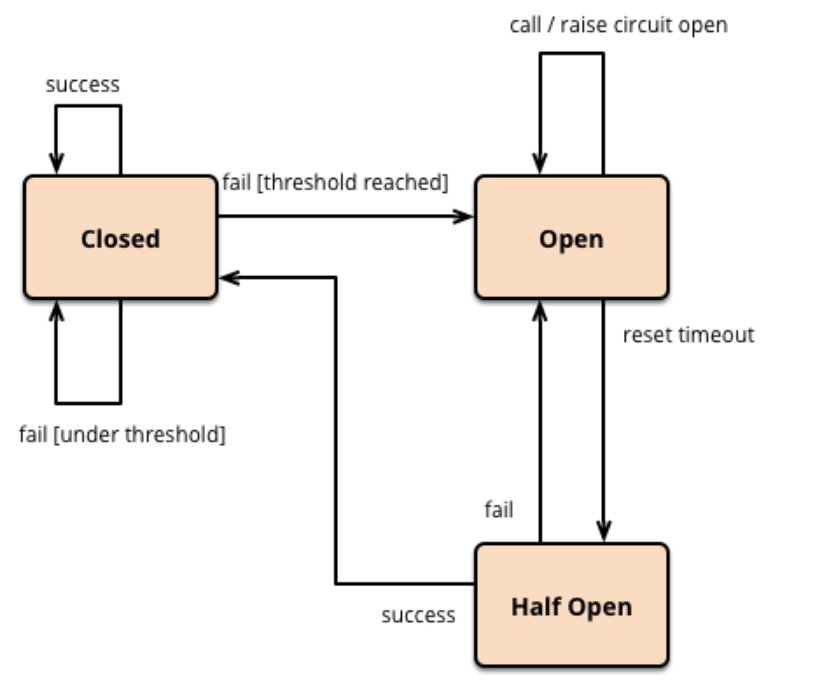
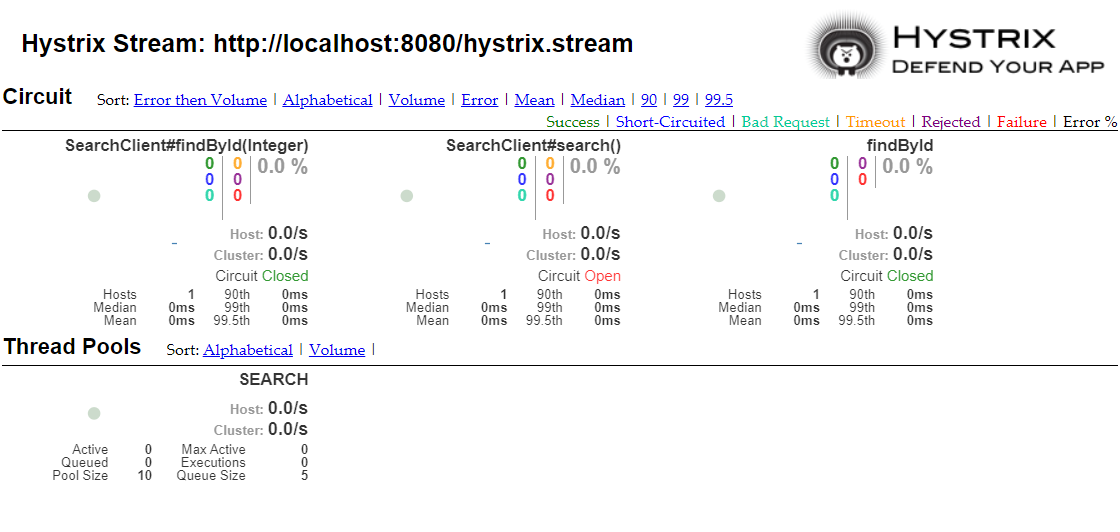
在调用指定服务时,如果说这个服务的失败率达到你输入的一个阈值,将断路器从closed状态,转变为open状态,指定服务时无法被访问的,如果你访问就直接走fallback方法,在一定的时间内,open状态会再次转变为half open状态,允许一个请求发送到我的指定服务,如果成功,转变为closed,如果失败,服务再次转变为open状态,会再次循环到half open,直到断路器回到一个closed状态。
| 断路器 |
|---|
 |
配置断路器的监控界面
导入依赖
xml
<dependency>
    <groupId>org.springframework.cloud</groupId>
    <artifactId>spring-cloud-starter-netflix-hystrix-dashboard</artifactId>
</dependency>在启动类中添加注解
@EnableHystrixDashboard配置一个Servlet路径,指定上Hystrix的Servlet
java
@WebServlet("/hystrix.stream")
public class HystrixServlet extends HystrixMetricsStreamServlet {
}

//------------------------------------------------------------
// 在启动类上,添加扫描Servlet的注解
@ServletComponentScan("com.futureweaver.servlet")测试直接访问http://host:port/hystrix
| 监控界面 |
|---|
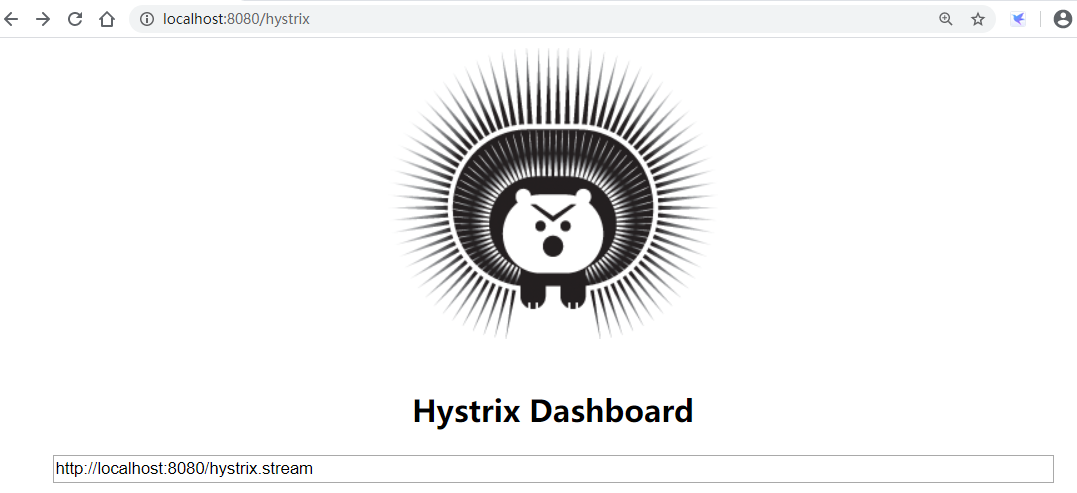 |
在当前位置输入映射好的servlet路径
| 检测效果 |
|---|
 |
配置断路器的属性
断路器的属性(默认10s秒中之内请求数)
| 配置信息 | name | value |
|---|---|---|
| 断路器的开关 | circuitBreaker.enabled | true |
| 失败阈值的总请求数 | circuitBreaker.requestVolumeThreshold | 20 |
| 请求总数失败率达到%多少时 | circuitBreaker.errorThresholdPercentage | 50 |
| 断路器open状态后,多少秒是拒绝请求的 | circuitBreaker.sleepWindowInMilliseconds | 5000 |
| 强制让服务拒绝请求 | circuitBreaker.forceOpen | false |
| 强制让服务接收请求 | circuitBreaker.forceClosed | false |
具体配置方式
java
@GetMapping("/customer/{id}")
@HystrixCommand(fallbackMethod = "findByIdFallBack",commandProperties = {
    @HystrixProperty(name = "circuitBreaker.enabled",value = "true"),
    @HystrixProperty(name = "circuitBreaker.requestVolumeThreshold",value = "10"),
    @HystrixProperty(name = "circuitBreaker.errorThresholdPercentage",value = "70"),
    @HystrixProperty(name = "circuitBreaker.sleepWindowInMilliseconds",value = "5000")
})请求缓存
请求缓存介绍
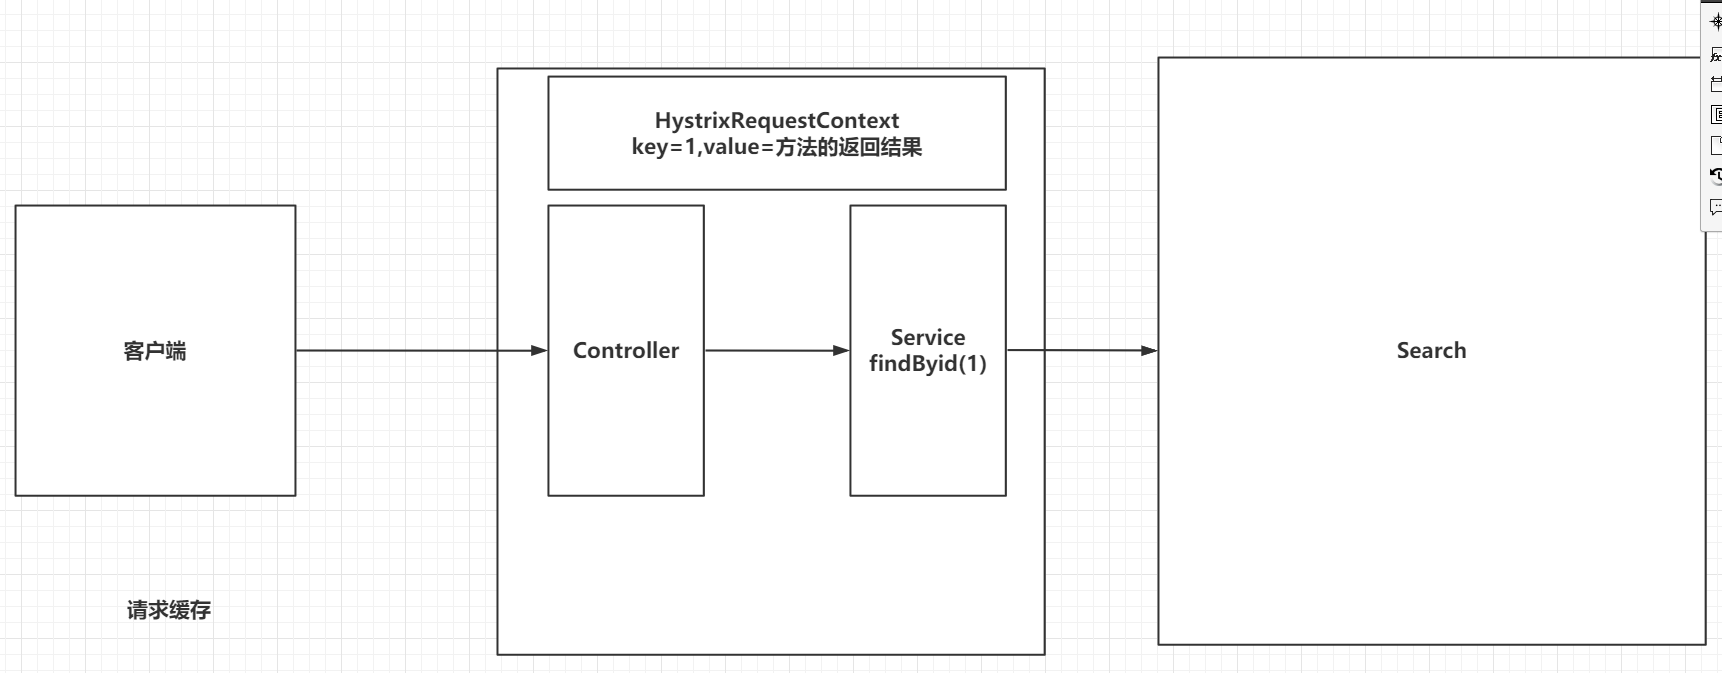
请求缓存的声明周期是一次请求
请求缓存是缓存当前线程中的一个方法,将方法参数作为key,方法的返回结果作为value
在一次请求中,目标方法被调用过一次,以后就都会被缓存。
| 请求缓存 |
|---|
 |
请求缓存的实现
创建一个Service,在Service中调用Search服务。
java
@Service
public class CustomerService {

    @Autowired
    private SearchClient searchClient;


    @CacheResult
    @HystrixCommand(commandKey = "findById")
    public Customer findById(@CacheKey Integer id) throws InterruptedException {
        return searchClient.findById(id);
    }

    @CacheRemove(commandKey = "findById")
    @HystrixCommand
    public void clearFindById(@CacheKey Integer id){
        System.out.println("findById被清空");
    }

}使用请求缓存的注解
@CacheResult:帮助我们缓存当前方法的返回结果(必须@HystrixCommand配合使用)
@CacheRemove:帮助我们清楚某一个缓存信息(基于commandKey)
@CacheKey:指定哪个方法参数作为缓存的标识修改Search模块的返回结果
return new Customer(1,"张三",(int)(Math.random() * 100000));编写Filter,去构建HystrixRequestContext
java
@WebFilter("/*")
public class HystrixRequestContextInitFilter implements Filter {

    @Override
    public void doFilter(ServletRequest servletRequest, ServletResponse servletResponse, FilterChain filterChain) throws IOException, ServletException {
        HystrixRequestContext.initializeContext();
        filterChain.doFilter(servletRequest,servletResponse);
    }
}修改Controller
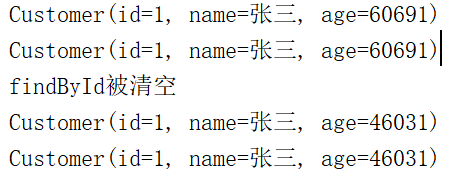
java
public Customer findById(@PathVariable Integer id) throws InterruptedException {
    System.out.println(customerService.findById(id));
    System.out.println(customerService.findById(id));
    customerService.clearFindById(id);
    System.out.println(customerService.findById(id));
    System.out.println(customerService.findById(id));
    return searchClient.findById(id);
}测试结果
服务的网关-Zuul【已被弃用】
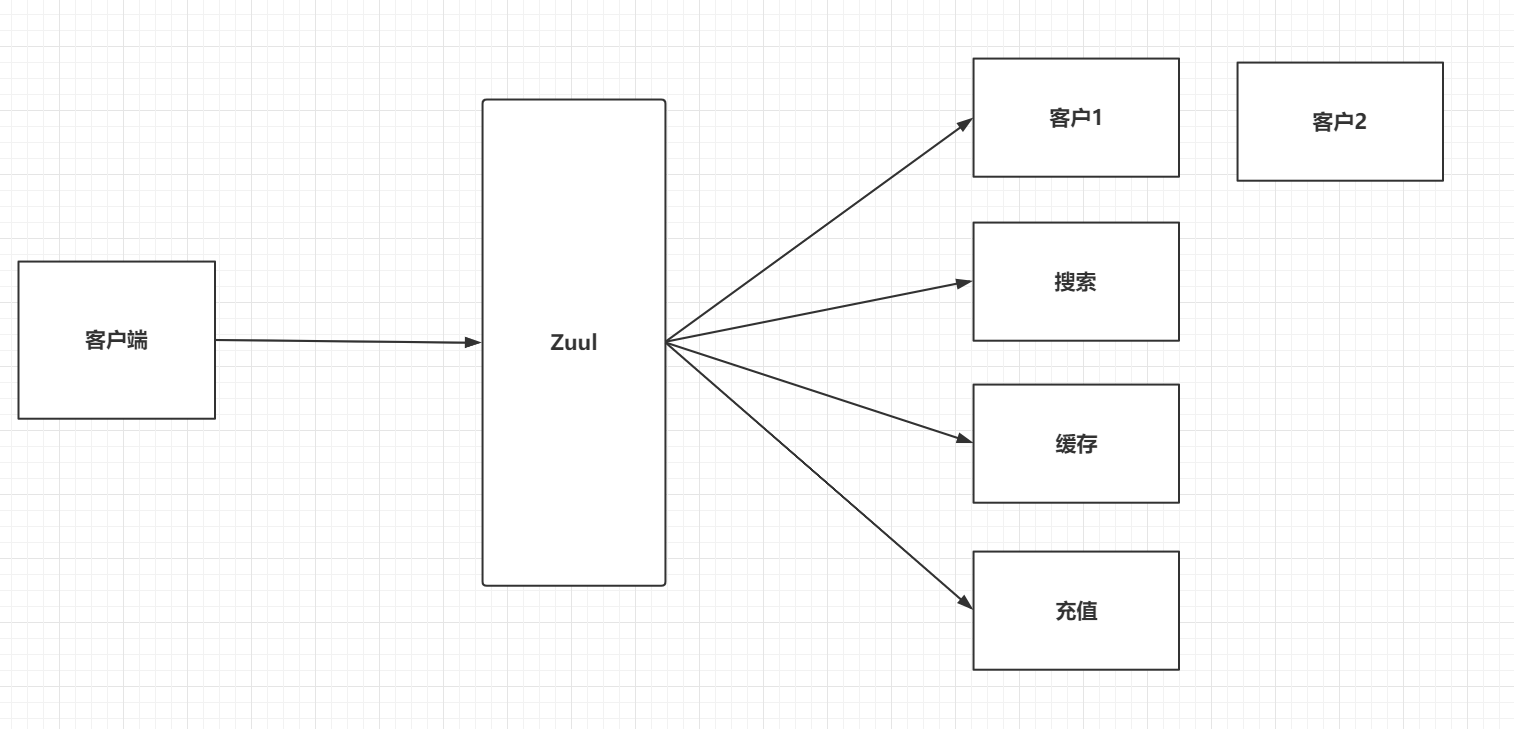
引言
客户端维护大量的ip和port信息,直接访问指定服务
认证和授权操作,需要在每一个模块中都添加认证和授权的操作
项目的迭代,服务要拆分,服务要合并,需要客户端进行大量的变化
统一的把安全性校验都放在Zuul中
| zuul |
|---|
 |
Zuul的快速入门
创建Maven项目,修改为SpringBoot
导入依赖
xml
<dependency>
    <groupId>org.springframework.cloud</groupId>
    <artifactId>spring-cloud-starter-netflix-zuul</artifactId>
</dependency>

<dependency>
    <groupId>org.springframework.cloud</groupId>
    <artifactId>spring-cloud-starter-netflix-eureka-client</artifactId>
</dependency>

<dependency>
    <groupId>org.springframework.boot</groupId>
    <artifactId>spring-boot-starter-web</artifactId>
</dependency>添加一个注解
java
@EnableDiscoveryClient
@EnableZuulProxy编写配置文件
yml
# 指定Eureka服务地址
eureka:
  client:
    service-url:
      defaultZone: http://root:root@localhost:8761/eureka,http://root:root@localhost:8762/eureka

# 指定服务的名称
spring:
  application:
    name: ZUUL

server:
port: 80直接测试
| 测试效果 |
|---|
 |
Zuul常用配置信息
Zuul的监控界面
导入依赖
xml
<dependency>
    <groupId>org.springframework.boot</groupId>
    <artifactId>spring-boot-starter-actuator</artifactId>
</dependency>编写配置文件
yml
 查看zuul的监控界面(开发时,配置为*,上线,不要配置)
management:
  endpoints:
    web:
      exposure:
include: "*"直接访问

忽略服务配置
yml
 zuul的配置
zuul:
  # 基于服务名忽略服务,无法查看 ,如果要忽略全部的服务  "*",默认配置的全部路径都会被忽略掉(自定义服务的配置,无法忽略的)
  ignored-services: eureka
  # 监控界面依然可以查看,在访问的时候,404
ignored-patterns: /**/search/**自定义服务配置
yml
 zuul的配置
zuul:
  # 指定自定义服务(方式一 , key(服务名):value(路径))
  routes:
    search: /ss/**
    customer: /cc/**
  # 指定自定义服务(方式二)
  routes:
    kehu:   # 自定义名称
      path: /ccc/**     # 映射的路径
serviceId: customer # 服务名称灰度发布
添加一个配置类
java
@Bean
public PatternServiceRouteMapper serviceRouteMapper() {
    return new PatternServiceRouteMapper(
        "(?<name>^.+)-(?<version>v.+$)",
        "${version}/${name}");
}准备一个服务,提供2个版本
yml
version: v1

# 指定服务的名称
spring:
  application:
name: CUSTOMER-${version}修改Zuul的配置
yml
 zuul的配置
zuul:
  # 基于服务名忽略服务,无法查看  , 如果需要用到-v的方式,一定要忽略掉
# ignored-services: "*"测试
| 测试效果 |
|---|
 |
Zuul的过滤器执行流程
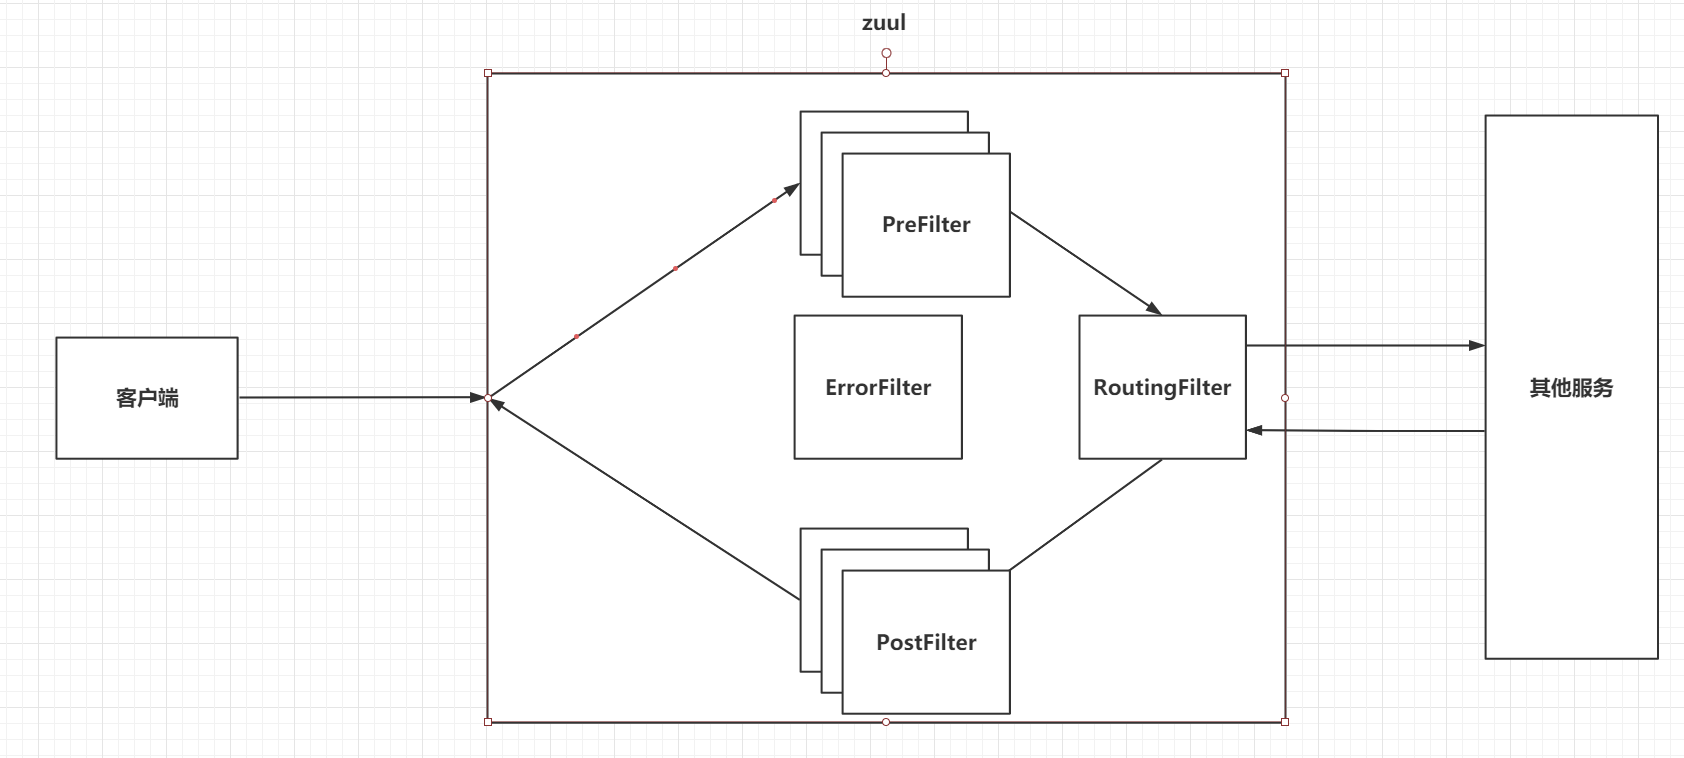
客户端请求发送到Zuul服务上,首先通过PreFilter链,如果正常放行,会吧请求再次转发给RoutingFilter,请求转发到一个指定的服务,在指定的服务响应一个结果之后,再次走一个PostFilter的过滤器链,最终再将响应信息交给客户端。
| 过滤器 |
|---|
 |
Zuul过滤器入门
创建POJO类,继承ZuulFilter抽象类
java
@Component
public class TestZuulFilter extends ZuulFilter {}指定当前过滤器的类型
java
@Override
public String filterType() {
    return FilterConstants.PRE_TYPE;
}指定过滤器的执行顺序
java
@Override
public int filterOrder() {
    return FilterConstants.PRE_DECORATION_FILTER_ORDER - 1;
}配置是否启用
java
@Override
public boolean shouldFilter() {
    // 开启当前过滤器
    return true;
}指定过滤器中的具体业务代码
java
@Override
public Object run() throws ZuulException {
    System.out.println("prefix过滤器执行~~~");
    return null;
}测试
| 效果 |
|---|
 |
PreFilter实现token校验
准备访问路径,请求参数传递token
http://localhost/v2/customer/version?token=123创建AuthenticationFilter
java
@Component
public class AuthenticationFilter extends ZuulFilter {
    @Override
    public String filterType() {
        return FilterConstants.PRE_TYPE;
    }

    @Override
    public int filterOrder() {
        return PRE_DECORATION_FILTER_ORDER - 2;
    }

    @Override
    public boolean shouldFilter() {
        return true;
    }

    @Override
    public Object run() throws ZuulException {
        //..
    }

}在run方法中编写具体的业务逻辑代码
java
@Override
public Object run() throws ZuulException {
    //1. 获取Request对象
    RequestContext requestContext = RequestContext.getCurrentContext();
    HttpServletRequest request = requestContext.getRequest();

    //2. 获取token参数
    String token = request.getParameter("token");

    //3. 对比token
    if(token == null || !"123".equalsIgnoreCase(token)) {
        //4. token校验失败,直接响应数据
        requestContext.setSendZuulResponse(false);
        requestContext.setResponseStatusCode(HttpStatus.UNAUTHORIZED.value());
    }
    return null;
}测试
| 效果 |
|---|
 |
Zuul的降级
创建POJO类,实现接口FallbackProvider
java
@Component
public class ZuulFallBack implements FallbackProvider {}重写两个方法
java
@Override
public String getRoute() {
    return "*";   // 代表指定全部出现问题的服务,都走这个降级方法
}

@Override
public ClientHttpResponse fallbackResponse(String route, Throwable cause) {
    System.out.println("降级的服务:" + route);
    cause.printStackTrace();

    return new ClientHttpResponse() {
        @Override
        public HttpStatus getStatusCode() throws IOException {
            // 指定具体的HttpStatus
            return HttpStatus.INTERNAL_SERVER_ERROR;
        }

        @Override
        public int getRawStatusCode() throws IOException {
            // 返回的状态码
            return HttpStatus.INTERNAL_SERVER_ERROR.value();
        }

        @Override
        public String getStatusText() throws IOException {
            // 指定错误信息
            return HttpStatus.INTERNAL_SERVER_ERROR.getReasonPhrase();
        }

        @Override
        public void close() {

        }

        @Override
        public InputStream getBody() throws IOException {
            // 给用户响应的信息
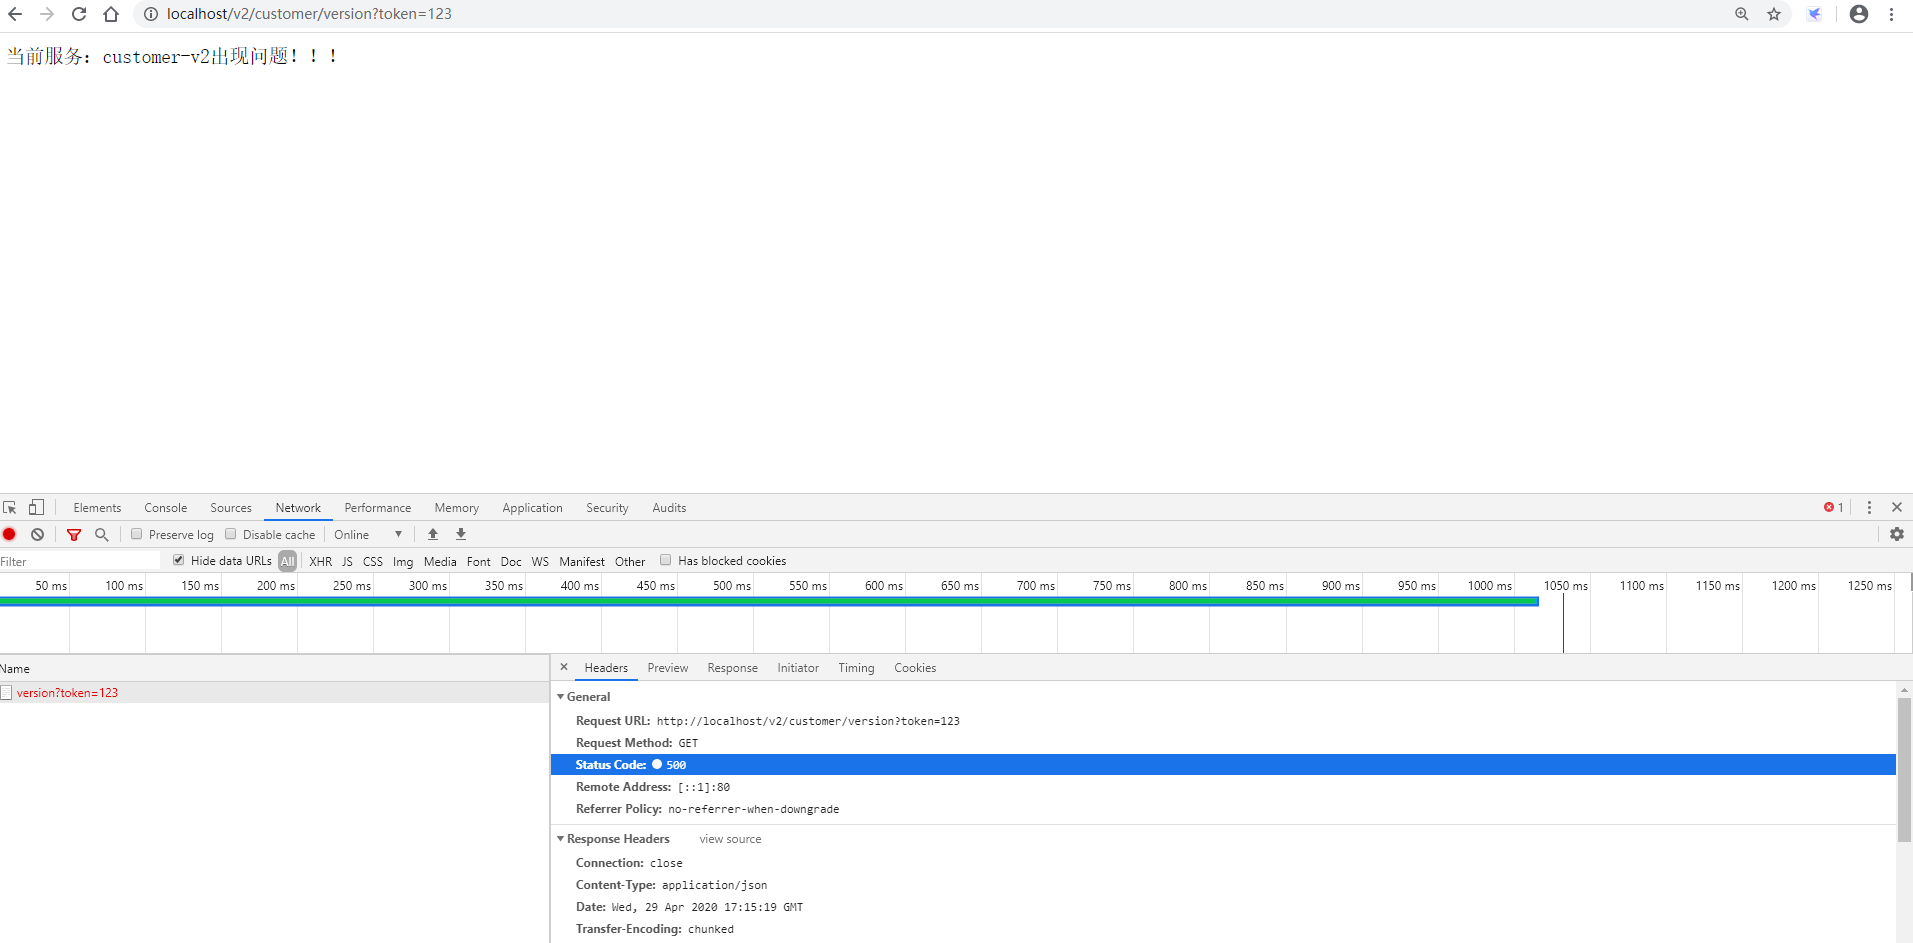
            String msg = "当前服务:" + route + "出现问题!!!";
            return new ByteArrayInputStream(msg.getBytes());
        }

        @Override
        public HttpHeaders getHeaders() {
            // 指定响应头信息
            HttpHeaders headers = new HttpHeaders();
            headers.setContentType(MediaType.APPLICATION_JSON);
            return headers;
        }
    };
}测试
| 效果 |
|---|
 |
Zuul动态路由
创建一个过滤器
java
// 执行顺序最好放在Pre过滤器的最后面在run方法中编写业务逻辑
java
@Override
public Object run() throws ZuulException {
    //1. 获取Request对象
    RequestContext context = RequestContext.getCurrentContext();
    HttpServletRequest request = context.getRequest();

    //2. 获取参数,redisKey
    String redisKey = request.getParameter("redisKey");

    //3. 直接判断
    if(redisKey != null && redisKey.equalsIgnoreCase("customer")){
        // http://localhost:8080/customer
        context.put(FilterConstants.SERVICE_ID_KEY,"customer-v1");
        context.put(FilterConstants.REQUEST_URI_KEY,"/customer");
    }else if(redisKey != null && redisKey.equalsIgnoreCase("search")){
        // http://localhost:8081/search/1
        context.put(FilterConstants.SERVICE_ID_KEY,"search");
        context.put(FilterConstants.REQUEST_URI_KEY,"/search/1");
    }

    return null;
}测试
| 效果 |
|---|
 |
Gateway
快速入门
导入依赖
注意
导入spring-boot-starter-web依赖后会发生冲突
因为spring cloud gateway是基于netty的webflux响应式框架,必须要使用内置tomcat,无法部署到外置tomcat这种传统的servlet容器
xml
<dependency>
    <groupId>org.springframework.cloud</groupId>
    <artifactId>spring-cloud-starter-gateway</artifactId>
</dependency>

<dependency>
    <groupId>org.springframework.cloud</groupId>
    <artifactId>spring-cloud-starter-netflix-eureka-client</artifactId>
</dependency>编写配置文件
yml
server:
  port: 8010

# 指定Eureka服务地址
eureka:
  client:
    service-url:
      defaultZone: http://localhost:8761/eureka

# 指定服务的名称
spring:
  application:
    name: GATEWAY
  cloud:
    gateway:
      discovery:
        locator:
          enabled: true
      routes:
        - id: customer
          uri: lb://customer
          predicates:
            - Path=/customer/**
          filters:
            - StripPrefix=1  # 如果为1,请求/name/bar/foo,则保留/bar/foo;如果为2,则保留/foo

        - id: search
          uri: lb://search
          predicates:
            - Path=/search/**
          filters:
- StripPrefix=1 # 如果为1,请求/name/bar/foo,则保留/bar/foo;如果为2,则保留/foo编写启动器
java
@SpringBootApplication
@EnableDiscoveryClient
public class GatewayApplication {
    public static void main(String[] args) {
        SpringApplication.run(GatewayApplication.class,  args);
    }
}多语言支持-Sidecar
引言
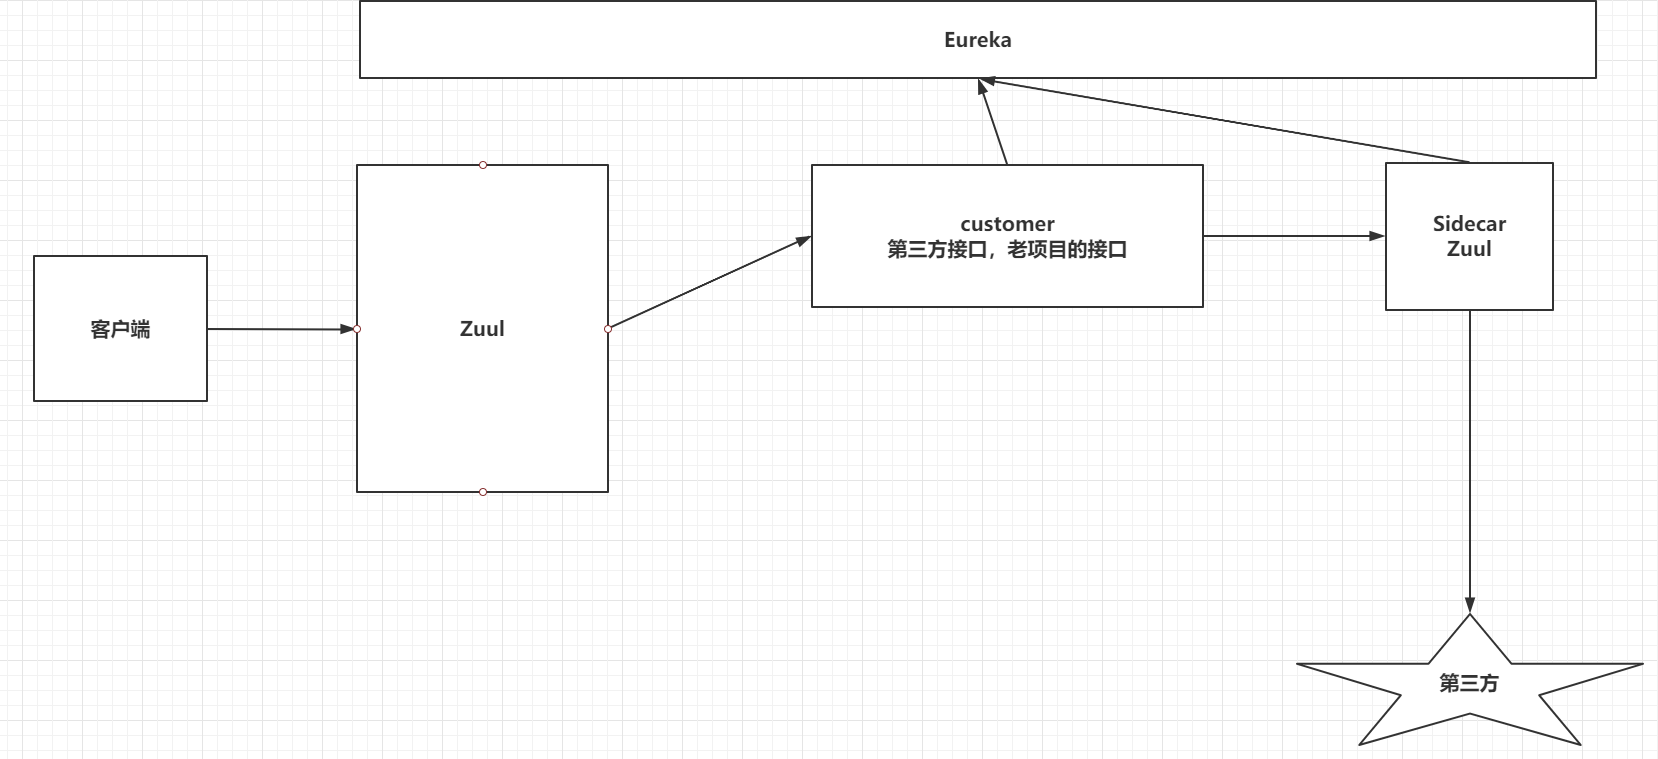
在SpringCloud的项目中,需要接入一些非Java的程序,第三方接口,无法接入eureka,hystrix,feign等等组件。启动一个代理的微服务,代理微服务去和非Java的程序或第三方接口交流,通过代理的微服务去计入SpringCloud的相关组件。
| sidecar |
|---|
 |
Sidecar实现
创建一个第三方的服务
创建一个SpringBoot工程,并且添加一个Controller创建maven工程,修改为SpringBoot
导入依赖
xml
<dependency>
    <groupId>org.springframework.cloud</groupId>
    <artifactId>spring-cloud-netflix-sidecar</artifactId>
</dependency>

<dependency>
    <groupId>org.springframework.cloud</groupId>
    <artifactId>spring-cloud-starter-netflix-eureka-client</artifactId>
</dependency>添加注解
java
@EnableSidecar编写配置文件
yml
server:
  port: 81

 指定Eureka服务地址
eureka:
  client:
    service-url:
      defaultZone: http://root:root@localhost:8761/eureka,http://root:root@localhost:8762/eureka
 指定服务名称
spring:
  application:
    name: other-service


 指定代理的第三方服务
sidecar:
port: 70016、 通过customer通过feign调用第三方服务
| 效果 |
|---|
 |
服务间消息传递-Stream
引言
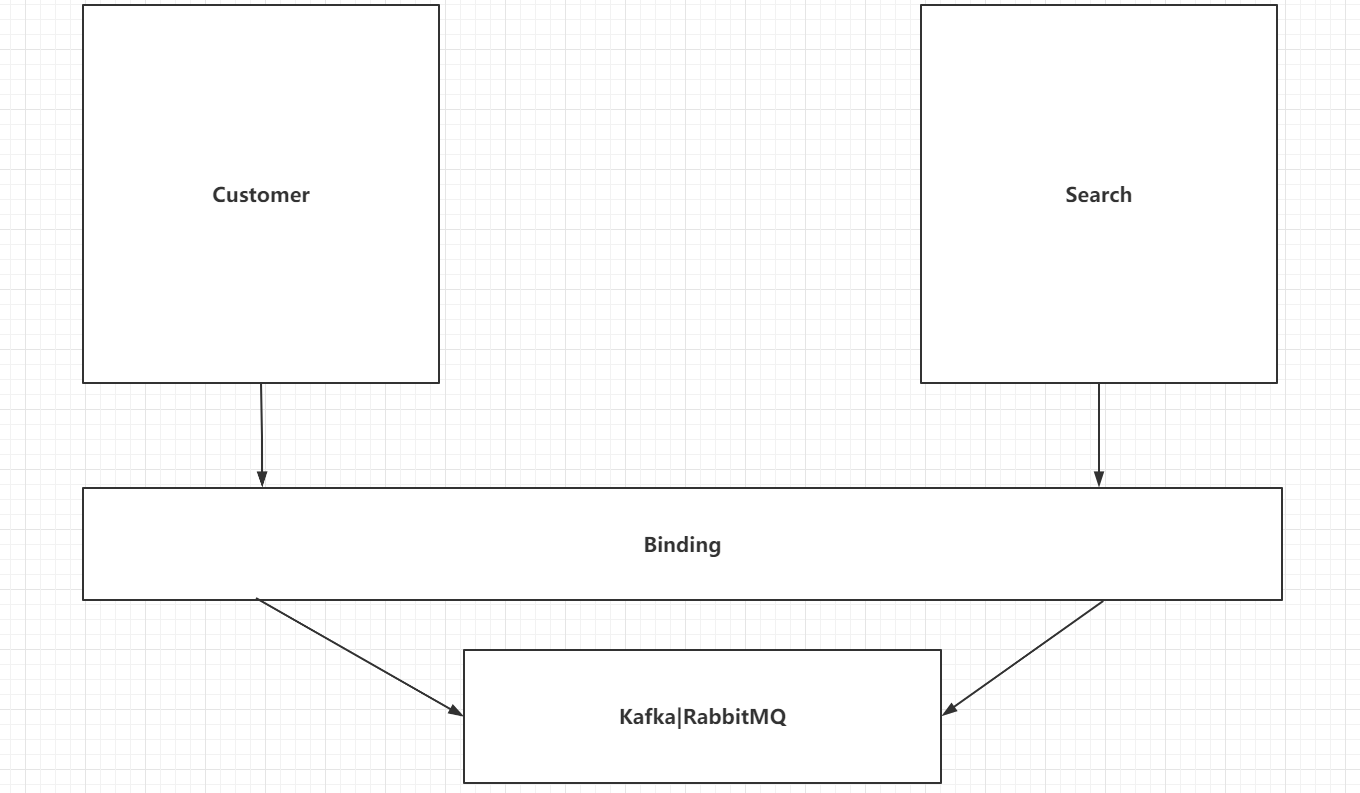
Stream就是在消息队列的基础上,对其进行封装,让咱们更方便的去操作MQ消息队列。
| 效果 |
|---|
 |
Stream快速入门
消费者
- pom.xml
xml
<dependency>
    <groupId>org.springframework.cloud</groupId>
    <artifactId>spring-cloud-starter-stream-rabbit</artifactId>
</dependency>- application.yml
yml
spring:
  # 连接RabbitMQ
  rabbitmq:
    host: 192.168.199.109
    port: 5672
    username: test
    password: test
virtual-host: /test- StreamClient.java
java
@Component
public interface StreamClient {
    @Input("myMessage")
    SubscribableChannel input();
}- StreamConsumer.java
java
@Component
@EnableBinding(StreamClient.class)
public class StreamReceiver {
    @StreamListener("myMessage")
    public void msg(Object msg){
        System.out.println("接收到消息: " + msg);
    }
}生产者
- pom.xml
xml
<dependency>
    <groupId>org.springframework.cloud</groupId>
    <artifactId>spring-cloud-starter-stream-rabbit</artifactId>
</dependency>- application.yml
yml
spring:
  # 连接RabbitMQ
  rabbitmq:
    host: 192.168.199.109
    port: 5672
    username: test
    password: test
virtual-host: /test- StreamClient.java
java
@Component
public interface StreamClient {
    @Output("myMessage")
    MessageChannel output();
}- StreamPublisher.java
java
@Controller
public class StreamPublisher {

    @Autowired
    private StreamClient streamClient;

    @GetMapping("/publish")
    public void publish() {
        Message<String> build = MessageBuilder.withPayload("Hello this is my produced message").build();
        streamClient.channel().send(build);
    }
}Stream重复消费问题
只需要添加一个配置,指定消费者组
yml
spring:
  cloud:
    stream:
      bindings:
        myMessage:    # 队列名称
group: customer # 消费者组Stream的消费者手动ack
编写配置
yml
spring:
  cloud:
    stream:
      # 实现手动ACK
      rabbit:
        bindings:
          myMessage:
            consumer:
acknowledgeMode: MANUAL修改消费端方法
yml
@StreamListener("myMessage")
public void msg(Object msg,
                @Header(name = AmqpHeaders.CHANNEL) Channel channel,
                @Header(name = AmqpHeaders.DELIVERY_TAG) Long deliveryTag) throws IOException {
    System.out.println("接收到消息: " + msg);
    channel.basicAck(deliveryTag,false);
}服务的动态配置-Config【重点】
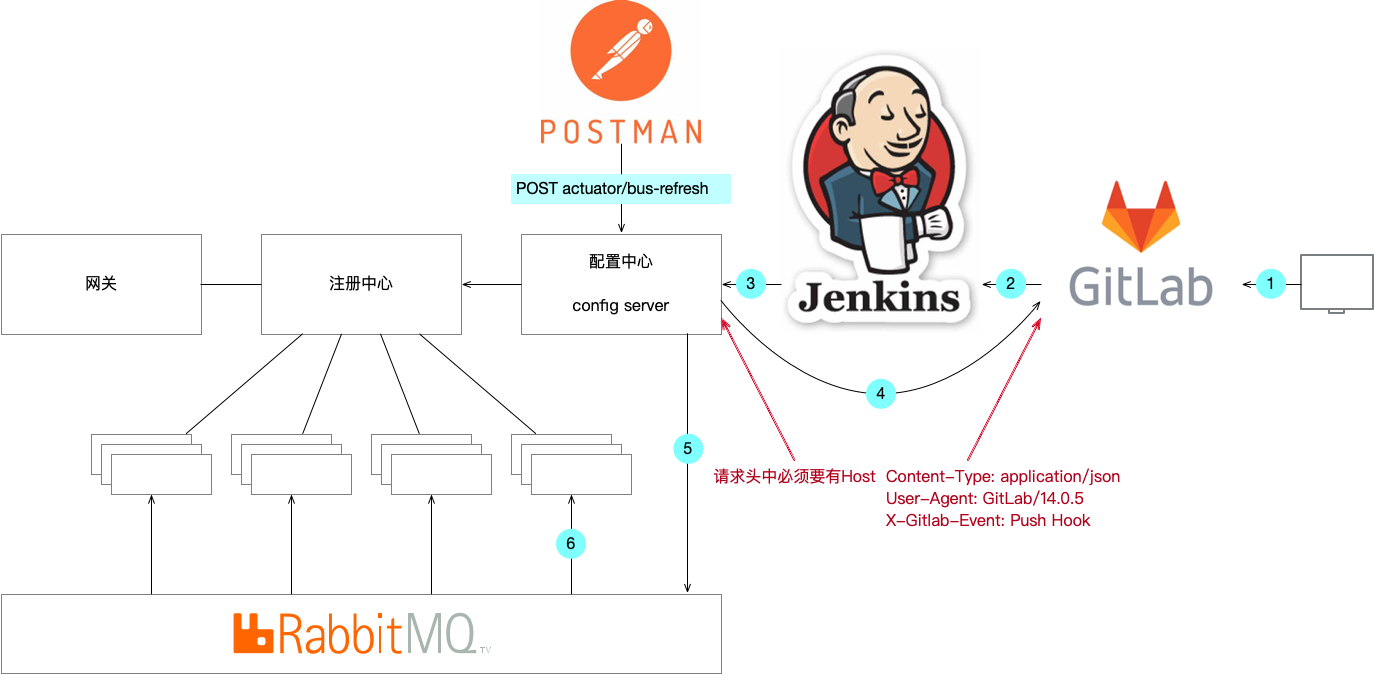
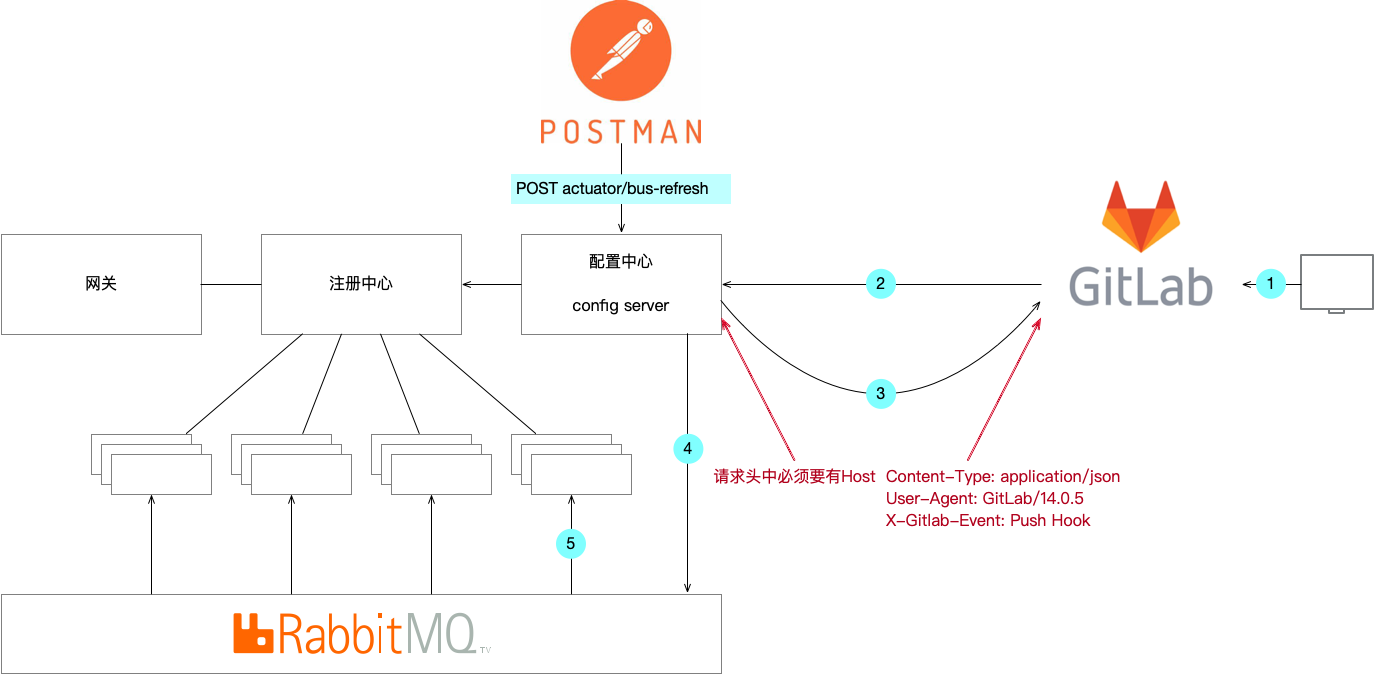
引言
配置文件分散在不同的项目中,不方便维护。
配置文件的安全问题。
修改完配置文件,无法立即生效。
| config |
|---|
 |
 |
搭建gitlab
- docker-compose.yml
yml
version: '3.9'
services:
  gitlab:
    image: gitlab/gitlab-ce:14.0.5-ce.0
    container_name: gitlab
    restart: always
    privileged: true
    hostname: gitlab
    environment:
      TZ: 'Asia/Shanghai'
      GITLAB_OMNIBUS_CONFIG: |
        puma['worker_timeout'] = 60
        puma['worker_processes'] = 2
        postgresql['shared_buffers'] = "256MB" # recommend value is 1/4 of total RAM, up to 14GB.
        prometheus_monitoring['enable'] = false
    ports:
      - '8088:80'
      - '8443:443'
      - '8022:22'
    volumes:
      - ./config:/etc/gitlab
      - ./data:/var/opt/gitlab
      - ./logs:/var/log/gitlab

networks:
  default:
    external: true
name: global- 仓库中维护如下配置文件
- customer-dev.yml
- search-dev.yml
...
搭建rabbitmq
- docker-compose.yml
yml
version: "3.9"
services:
  rabbitmq:
    image: rabbitmq:3.8.9-management
    restart: always
    container_name: rabbitmq
    ports:
      - 5672:5672
      - 15672:15672
    volumes:
      - ./data:/var/lib/rabbitmq

networks:
  default:
    external: true
name: global搭建jenkins
运行Docker容器
- docker-compose.yml
yml
version: '3.9'
services:
  jenkins:
    image: jenkins/jenkins:2.289.1-lts
    container_name: jenkins
    restart: always
    ports:
      - '18080:8080'
      - '50000:50000'
    volumes:
      - './jenkins_home:/var/jenkins_home'

networks:
  default:
    external: true
name: global配置admin密码、API token
- 浏览器导航栏,点击
admin - 浏览器左边栏,点击
Configure API Token->Add new Token,保存生成的TokenPassword,配置admin密码
安装Jenkins插件
Jenkins首页,浏览器左边栏,点击Manage JenkinsManage PluginsAvailable-> 搜索Build Authorization Token Root- 勾选 ->
Download now and Install after restart
创建Jenkins项目
Jenkins首页,浏览器左边栏,点击New Itemitem name指定为config-center-refresh项目类型指定为
Freestyle projectBuild->Add build step->execute shell输入
curl -X POST http://CONFIG_SERVER_SITE/actuator/bus-refreshBuild Triggers->Trigger builds remotely (e.g., from scripts)填写
Authentication TokenSave
测试远程构建
- 浏览器输入
http://JENKINS_SITE/buildByToken/build?job=NAME&token=SECRET
搭建Config-Server
pom.xml
xml
<!-- spring-boot-starter-web -->
<dependency>
    <groupId>org.springframework.boot</groupId>
    <artifactId>spring-boot-starter-web</artifactId>
</dependency>

<!-- spring-boot-starter-actuator -->
<dependency>
    <groupId>org.springframework.boot</groupId>
    <artifactId>spring-boot-starter-actuator</artifactId>
</dependency>

<!-- spring-cloud-starter-netflix-eureka-client -->
<dependency>
    <groupId>org.springframework.cloud</groupId>
    <artifactId>spring-cloud-starter-netflix-eureka-client</artifactId>
</dependency>

<!-- spring-cloud-config-server -->
<dependency>
    <groupId>org.springframework.cloud</groupId>
    <artifactId>spring-cloud-config-server</artifactId>
</dependency>

<!-- spring-cloud-starter-bus-amqp -->
<dependency>
    <groupId>org.springframework.cloud</groupId>
    <artifactId>spring-cloud-starter-bus-amqp</artifactId>
</dependency>application.yml
yml
spring:
  cloud:
    config:
      server:
        git:
          basedir: /Users/LEAF/IdeaProjects/J2101-0708-springcloud/config-center
          username: root
          password: abcd1234
          uri: http://localhost:8088/root/config-center
          force-pull: true
  rabbitmq:
    host: localhost
    port: 5672
    username: test
    password: test
    virtual-host: /test

management:
  endpoints:
    web:
      exposure:
        include: "*"

logging:
  level:
    com.netflix.discovery: 'OFF'
    org.springframework.cloud: 'DEBUG'
org.springframework.web.servlet.DispatcherServlet: 'DEBUG'ConfigServerApplication.java
java
@SpringBootApplication
@EnableDiscoveryClient
@EnableConfigServer
public class ConfigServerApplication {
    public static void main(String[] args) {
        SpringApplication.run(ConfigServerApplication.class, args);
    }
}测试
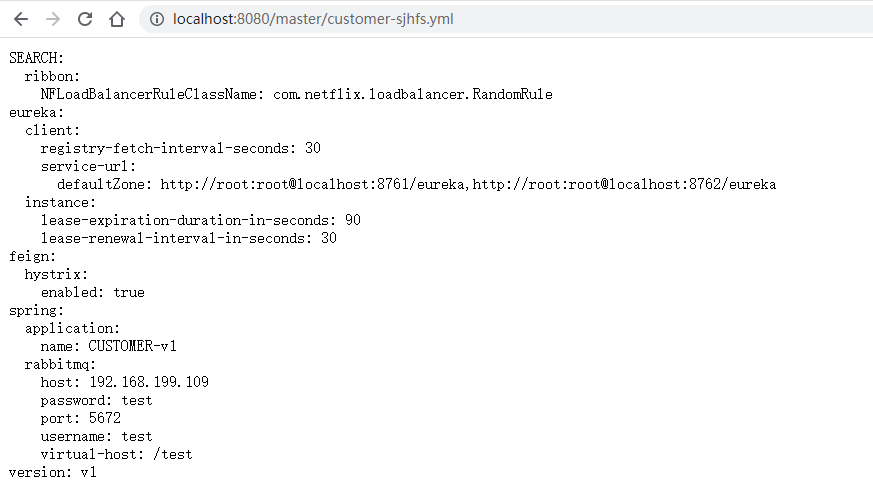
http://localhost:port/{label}/{application}-{profile}.yml
| 效果 |
|---|
 |
搭建Config-Client
pom.xml
xml
<!-- spring-boot-starter-web -->
<dependency>
    <groupId>org.springframework.boot</groupId>
    <artifactId>spring-boot-starter-web</artifactId>
</dependency>

<!-- spring-boot-starter-actuator -->
<dependency>
    <groupId>org.springframework.boot</groupId>
    <artifactId>spring-boot-starter-actuator</artifactId>
</dependency>

<!-- spring-cloud-starter-netflix-eureka-client -->
<dependency>
    <groupId>org.springframework.cloud</groupId>
    <artifactId>spring-cloud-starter-netflix-eureka-client</artifactId>
</dependency>

<!-- spring-cloud-config-client -->
<dependency>
    <groupId>org.springframework.cloud</groupId>
    <artifactId>spring-cloud-config-client</artifactId>
</dependency>

<!-- spring-cloud-starter-bus-amqp -->
<dependency>
    <groupId>org.springframework.cloud</groupId>
    <artifactId>spring-cloud-starter-bus-amqp</artifactId>
</dependency>bootstrap.yml
yml
server:
  port: 8082

eureka:
  instance:
    hostname: localhost
  client:
    service-url:
      default-zone: http://${eureka.instance.hostname}:8761/eureka/

spring:
  application:
    name: CUSTOMER
  cloud:
    config:
      discovery:
        enabled: true
        service-id: CONFIG-SERVER
      profile: dev
  rabbitmq:
    host: localhost
    port: 5672
    username: test
    password: test
    virtual-host: /test

management:
  endpoints:
    web:
      exposure:
include: "*"CustomController.java
java
package com.futureweaver.web;

import com.netflix.hystrix.contrib.javanica.annotation.HystrixCommand;
import org.springframework.beans.factory.annotation.Autowired;
import org.springframework.beans.factory.annotation.Value;
import org.springframework.cloud.context.config.annotation.RefreshScope;
import org.springframework.stereotype.Controller;
import org.springframework.web.bind.annotation.RequestMapping;
import org.springframework.web.bind.annotation.ResponseBody;
import org.springframework.web.client.RestTemplate;

@Controller
@RefreshScope
public class CustomController {

    @Value("${customstring}")
    private String customString;

    @RequestMapping("/custom")
    @ResponseBody
    public String custom() {
        return "custom string: " + customString;
    }
}配置gitlab-webhook
Gitlab开启远程访问

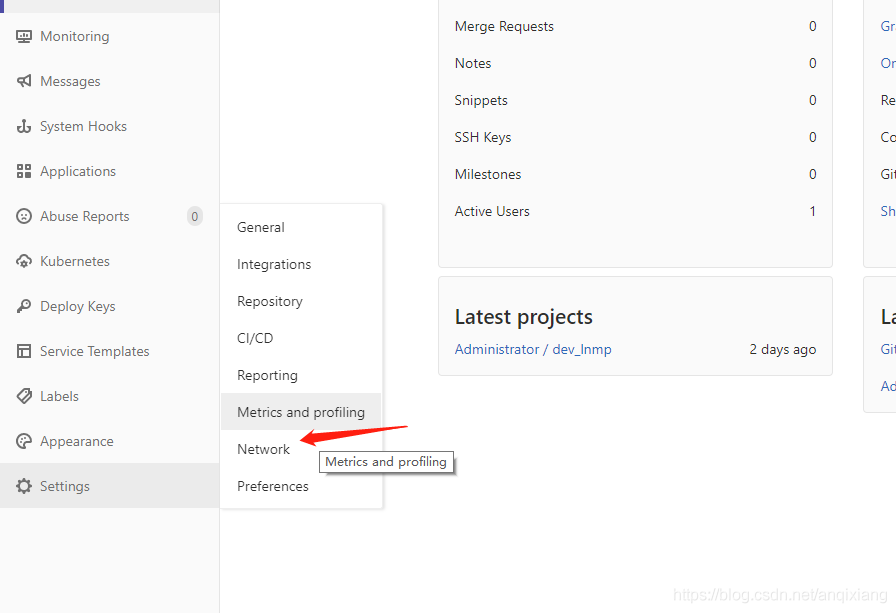
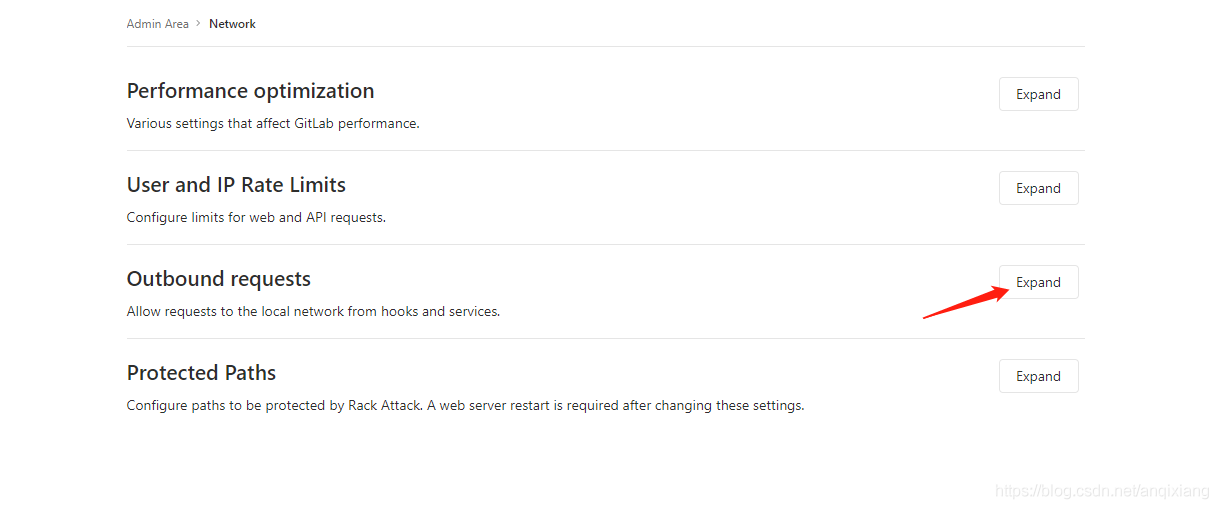
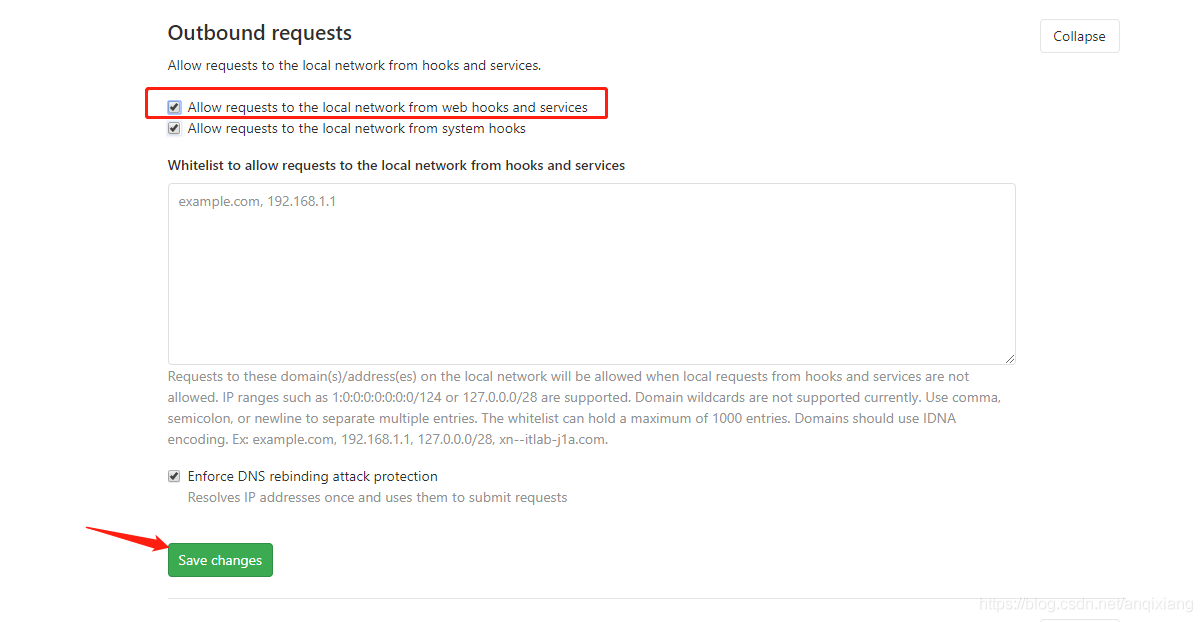
config-server允许get请求
- ConfigServerApplication.java
添加
@ServletComponentScan注解
java
@SpringBootApplication
@EnableDiscoveryClient
@EnableConfigServer
@ServletComponentScan("com.futureweaver.filter")
public class ConfigServerApplication {
    public static void main(String[] args) {
        SpringApplication.run(ConfigServerApplication.class, args);
    }
}- UrlFilter.java
java
import javax.servlet.*;
import javax.servlet.annotation.WebFilter;
import javax.servlet.http.HttpServletRequest;
import javax.servlet.http.HttpServletRequestWrapper;
import javax.servlet.http.HttpServletResponse;
import java.io.BufferedReader;
import java.io.ByteArrayInputStream;
import java.io.IOException;

@WebFilter("/*")
public class UrlFilter implements Filter {
    @Override
    public void init(FilterConfig filterConfig) throws ServletException {
    }

    @Override
    public void doFilter(ServletRequest request, ServletResponse response, FilterChain chain) throws IOException, ServletException {
        HttpServletRequest httpServletRequest = (HttpServletRequest)request;
        HttpServletResponse httpServletResponse = (HttpServletResponse)response;

        String url = new String(httpServletRequest.getRequestURI());

        //只过滤/actuator/bus-refresh请求
        if (!url.endsWith("/actuator/bus-refresh")) {
            chain.doFilter(request, response);
            return;
        }

        //获取原始的body
        String body = readAsChars(httpServletRequest);

        System.out.println("original body:   "+ body);

        //使用HttpServletRequest包装原始请求达到修改post请求中body内容的目的
        CustometRequestWrapper requestWrapper = new CustometRequestWrapper(httpServletRequest);

        chain.doFilter(requestWrapper, response);
    }

    @Override
    public void destroy() {
    }

    private class CustometRequestWrapper extends HttpServletRequestWrapper {
        public CustometRequestWrapper(HttpServletRequest request) {
            super(request);
        }

        @Override
        public ServletInputStream getInputStream() throws IOException {
            byte[] bytes = new byte[0];
            ByteArrayInputStream byteArrayInputStream = new ByteArrayInputStream(bytes);

            return new ServletInputStream() {
                @Override
                public boolean isFinished() {
                    return byteArrayInputStream.read() == -1 ? true:false;
                }

                @Override
                public boolean isReady() {
                    return false;
                }

                @Override
                public void setReadListener(ReadListener readListener) {

                }

                @Override
                public int read() throws IOException {
                    return byteArrayInputStream.read();
                }
            };
        }
    }

    public static String readAsChars(HttpServletRequest request) {
        BufferedReader br = null;
        StringBuilder sb = new StringBuilder("");
        try {
            br = request.getReader();
            String str;
            while ((str = br.readLine()) != null) {
                sb.append(str);
            }
            br.close();
        } catch (IOException e) {
            e.printStackTrace();
        } finally {
            if (null != br) {
                try {
                    br.close();
                } catch (IOException e) {
                    e.printStackTrace();
                }
            }
        }
        return sb.toString();
    }
}jenkins开启token认证
https://www.cnblogs.com/jiangzhaowei/p/10031762.html
http://{IP}:{端口号}/buildByToken/build?job={Job名称}&token={Token}
服务的追踪-Sleuth【重点】
引言
在整个微服务架构中,微服务很多,一个请求可能需要调用很多很多的服务,最终才能完成一个功能,如果说,整个功能出现了问题,在这么多的服务中,如何去定位到问题的所在点,出现问题的原因是什么。
Sleuth可以获得到整个服务链路的信息。
Zipkin通过图形化界面去看到信息。
Sleuth将日志信息存储到数据库中。
| Sleuth |
|---|
 |
Sleuth的使用
导入依赖
xml
<dependency>
    <groupId>org.springframework.cloud</groupId>
    <artifactId>spring-cloud-starter-sleuth</artifactId>
</dependency>编写配置文件
yml
logging:
  level:
org.springframework.web.servlet.DispatcherServlet: DEBUG测试
| 日志信息 |
|---|
 |
SEARCH:服务名称
e9c:总链路id
f07:当前服务的链路id
false:不会将当前的日志信息,输出其他系统中Zipkin的使用
搭建Zipkin的web工程 https://zipkin.io/
yml
version: "3.9"
services:
  zipkin:
    image: openzipkin/zipkin:2.23.0
    restart: always
    container_name: zipkin
    ports:
      - 9411:9411

networks:
  default:
    external: true
name: global导入依赖
xml
<dependency>
    <groupId>org.springframework.cloud</groupId>
    <artifactId>spring-cloud-starter-zipkin</artifactId>
</dependency>编写配置文件
yml
# 指定服务的名称
spring:
  sleuth:
    sampler:
      probability: 1   # 百分之多少的sleuth信息需要输出到zipkin中
  zipkin:
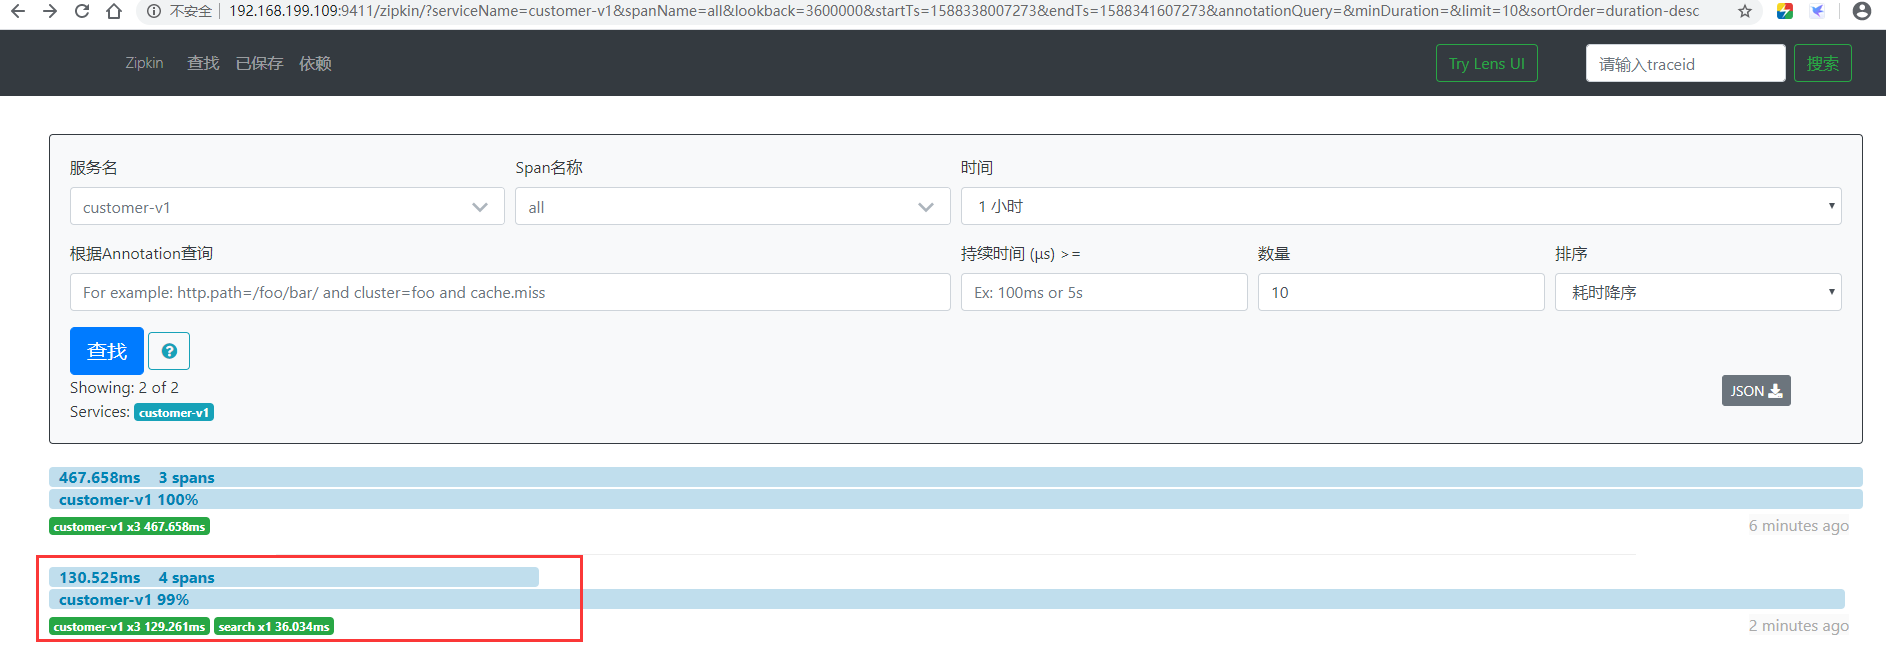
base-url: http://192.168.199.109:9411/ # 指定zipkin的地址测试
| 测试 |
|---|
 |
整合RabbitMQ
导入RabbitMQ依赖
xml
<!-- spring-cloud-starter-sleuth -->
<dependency>
    <groupId>org.springframework.cloud</groupId>
    <artifactId>spring-cloud-starter-sleuth</artifactId>
</dependency>

<!-- spring-cloud-starter-zipkin -->
<dependency>
    <groupId>org.springframework.cloud</groupId>
    <artifactId>spring-cloud-starter-zipkin</artifactId>
</dependency>

<!-- spring-cloud-starter-bus-amqp -->
<dependency>
    <groupId>org.springframework.cloud</groupId>
    <artifactId>spring-cloud-starter-bus-amqp</artifactId>
</dependency>修改配置文件
yml
spring:
  sleuth:
    sampler:
      probability: 1
  zipkin:
    sender:
      type: rabbit
  rabbitmq:
    host: localhost
    port: 5672
    username: test
    password: test
virtual-host: /test修改Zipkin的信息
yml
## docker-compose.yml

version: "3.9"
services:
  zipkin:
    image: openzipkin/zipkin:2.23.0
    restart: always
    container_name: zipkin
    ports:
      - 9411:9411
    environment:
      - RABBIT_ADDRESSES=rabbitmq:5672
      - RABBIT_USER=test
      - RABBIT_PASSWORD=test
      - RABBIT_VIRTUAL_HOST=/test

networks:
  default:
    external: true
name: global测试
| 测试 |
|---|
 |
Zipkin存储数据到ES
重新修改zipkin的yml文件
yml
version: "3.9"
services:
  zipkin:
    image: openzipkin/zipkin:2.23.0
    restart: always
    container_name: zipkin
    ports:
      - 9411:9411
    environment:
      - RABBIT_ADDRESSES=rabbitmq:5672
      - RABBIT_USER=test
      - RABBIT_PASSWORD=test
      - RABBIT_VIRTUAL_HOST=/test
      - STORAGE_TYPE=elasticsearch
      - ES_HOSTS=elasticsearch:9200

networks:
  default:
    external: true
name: global完整SpringCloud架构图【重点】
| 完整架构图 |
|---|
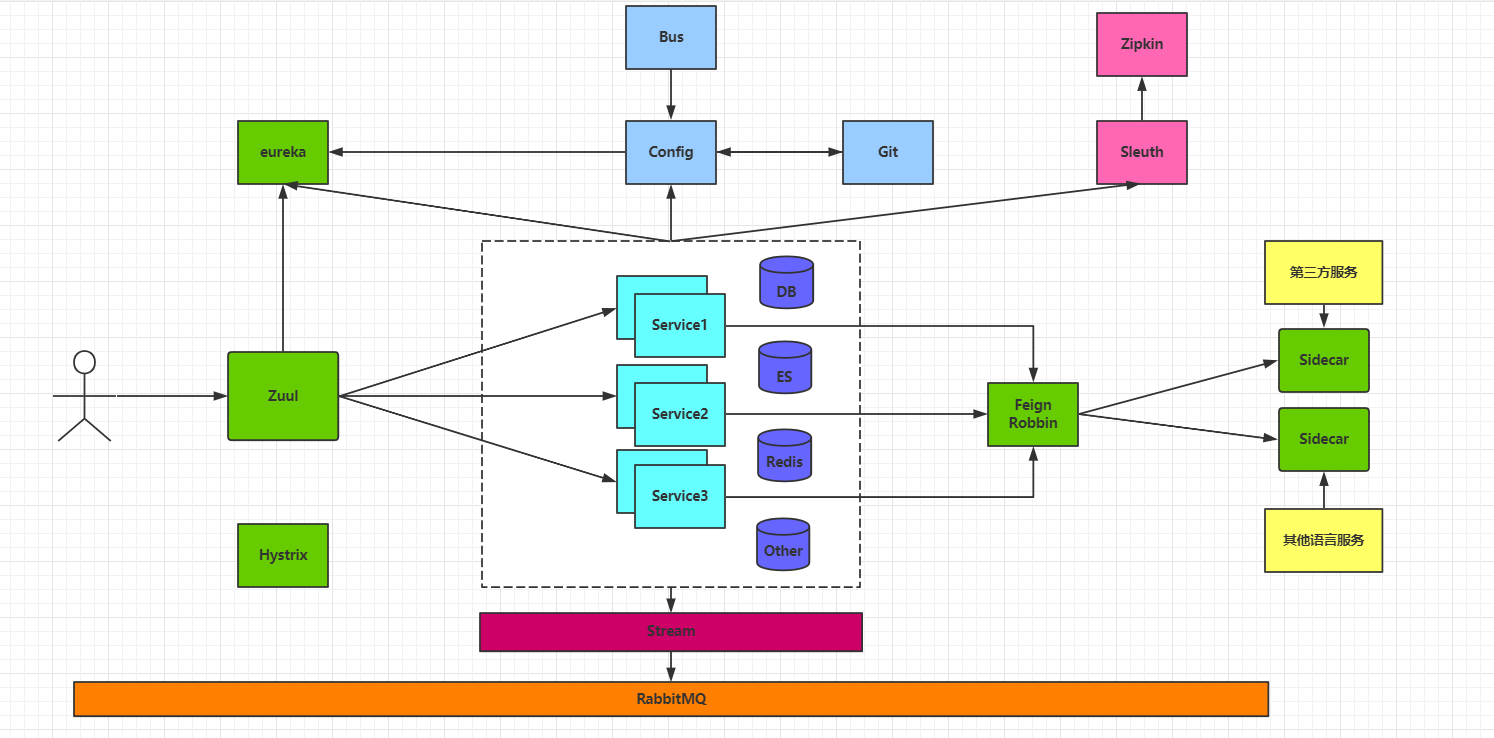 |
Idea模板
pom.xml
xml
<?xml version="1.0" encoding="UTF-8"?>
<project xmlns="http://maven.apache.org/POM/4.0.0"
         xmlns:xsi="http://www.w3.org/2001/XMLSchema-instance"
         xsi:schemaLocation="http://maven.apache.org/POM/4.0.0 http://maven.apache.org/xsd/maven-4.0.0.xsd">
    <modelVersion>4.0.0</modelVersion>
    <groupId>${GROUP_ID}</groupId>
    <artifactId>${ARTIFACT_ID}</artifactId>
    <version>${VERSION}</version>

# if (${HAS_PARENT})
    <parent>
        <groupId>${PARENT_GROUP_ID}</groupId>
        <artifactId>${PARENT_ARTIFACT_ID}</artifactId>
        <version>${PARENT_VERSION}</version>
# if (${HAS_RELATIVE_PATH})
        <relativePath>${PARENT_RELATIVE_PATH}</relativePath>
# end
    </parent>
# end

    <dependencies>
        <!-- spring-cloud-config-client -->
        <!-- spring-cloud-config-server -->
        <!-- spring-cloud-netflix-sidecar -->
        <!-- spring-cloud-starter-bus-amqp -->
        <!-- spring-cloud-starter-netflix-eureka-client -->
        <!-- spring-cloud-starter-netflix-eureka-server -->
        <!-- spring-cloud-starter-netflix-hystrix -->
        <!-- spring-cloud-starter-netflix-hystrix-dashboard -->
        <!-- spring-cloud-starter-netflix-ribbon -->
        <!-- spring-cloud-starter-netflix-zuul -->
        <!-- spring-cloud-starter-openfeign -->
        <!-- spring-cloud-starter-sleuth -->
        <!-- spring-cloud-starter-zipkin -->

        <!-- spring-boot-starter-data-redis -->
        <!-- spring-boot-starter-data-elasticsearch -->
        <!-- spring-boot-starter-amqp -->

        <!-- spring-boot-starter -->
        <!-- spring-boot-starter-web -->
        <!-- spring-boot-devtools -->
        <!-- spring-boot-starter-test -->
        <!-- tomcat-embed-jasper -->
        <!-- mybatis-spring-boot-starter -->
        <!-- druid-spring-boot-starter -->
        <!-- pagehelper-spring-boot-starter -->

        <!-- javax.servlet-api -->
        <!-- spring-context -->
        <!-- spring-aspects -->
        <!-- spring-web -->
        <!-- spring-webmvc -->
        <!-- spring-jdbc -->
        <!-- jackson-databind -->
        <!-- hibernate-validator -->
        <!-- taglibs-standard-impl -->
        <!-- taglibs-standard-spec -->
        <!-- mysql-connector-j -->
        <!-- druid -->
        <!-- mybatis -->
        <!-- mybatis-spring -->
        <!-- pagehelper -->

        <!-- slf4j-api -->
        <!-- slf4j-simple/logback-classic -->
        <!-- log4j -->
    </dependencies>

    <build>
        <plugins>
            <plugin>
                <groupId>org.springframework.boot</groupId>
                <artifactId>spring-boot-maven-plugin</artifactId>
            </plugin>
        </plugins>

        <resources>
            <resource>
                <directory>src/main/java</directory>
                <includes>
                    <include>*.xml</include>
                    <include>**/*.xml</include>
                </includes>
                <filtering>true</filtering>
            </resource>

            <resource>
                <directory>src/main/resources</directory>
                <includes>
                    <include>*</include>
                </includes>
                <filtering>true</filtering>
            </resource>
        </resources>
    </build>

</project>参考资料
https://blog.csdn.net/anqixiang/article/details/104968469https://www.cnblogs.com/jiangzhaowei/p/10031762.html